
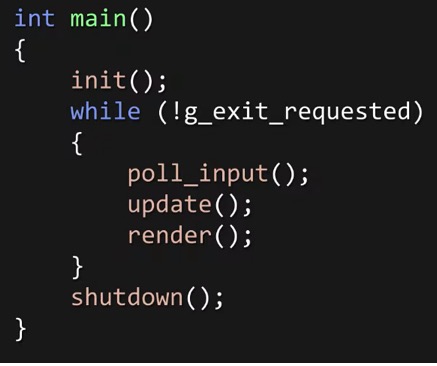
One of the most fundamental concepts in game programming – and one of the simplest – is the idea of the game loop.

When your program runs, you do some initializations to set things up, and then you run a loop for as long as the player wants to keep playing: each frame, you process input, you update the state of the game world, and you render the result to the screen. When the player shuts down the game, you do some cleanup, and you’re done.
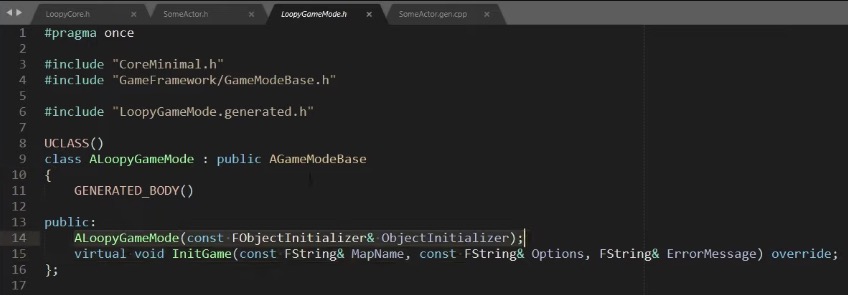
But if you are writing game code in unreal engine, you’re not dealing with a game loop directly. You don’t start at the main function, you start by defining a GameMode subclass and overriding a function like InitGame. Or you’re writing one of Actor and Component classes, and you override their BeginPlay or Tick functions to add your own logic. And that’s really all you have to do at a minimum: the Engine takes care of everything else for you, which is exactly what you want when you’re starting out.
The engine is open-source, of course, but it’s also designed to be extensible in a number of different ways.
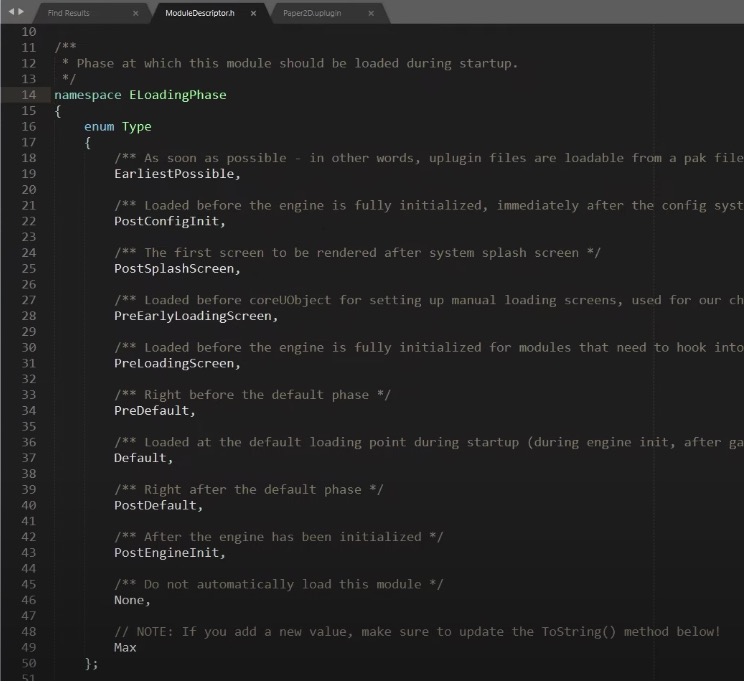
When you make a game project or a plugin that has C++ source code, you define one or more source modules in your .uproject or .uplugin file, and you can specify a LoadingPhase to dictate when that module will be loaded.
The engine is splitted into different source modules as well. Some modules are more essential than others, and some are only loaded on certain platforms, or in certain situations – so a module system helps to make sure that the dependencies between different parts of the codebase are manageable, and it makes sure that we can just load what we need for any given configuration.

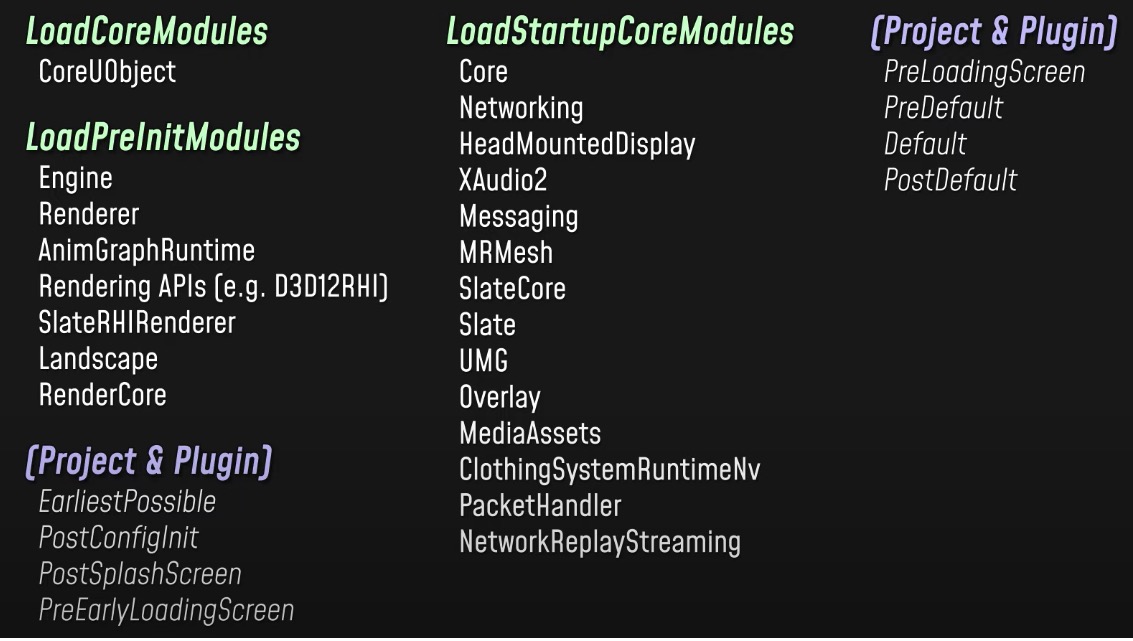
When the engine loop begins its preInit phase, it loads up some low-level engine modules, so that the essential systems are initialized and the essential types are defined.
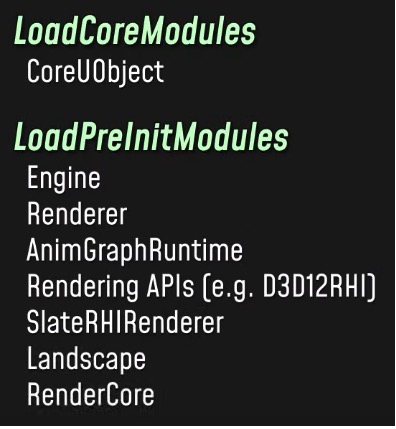
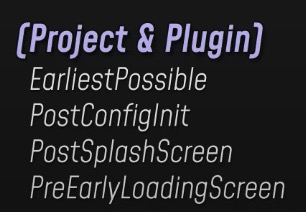
Then if your project or any enabled plugins have source modules that are in these early loading phases, those are loaded next.
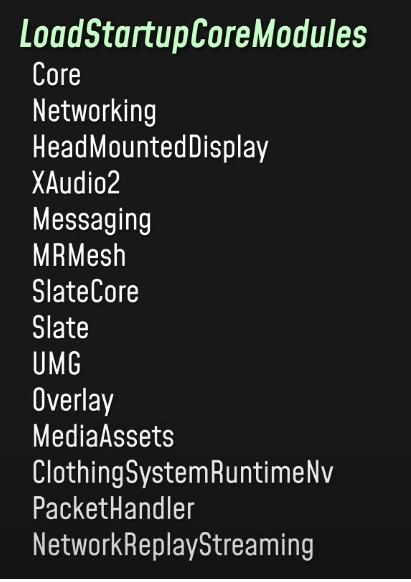
After that, the bulk of higher-level engine modules are loaded.
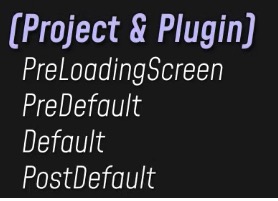
After that, we come to the default point where project and plugin modules are loaded. This is typically the point where your game’s C++ code is first injected into what was previously just a generic instance of Unreal Engine. You game module comes into being at a point where all the essential engine functionality has been loaded and initialized, but before any actual game state has been created.
So what happens when your module is loaded?
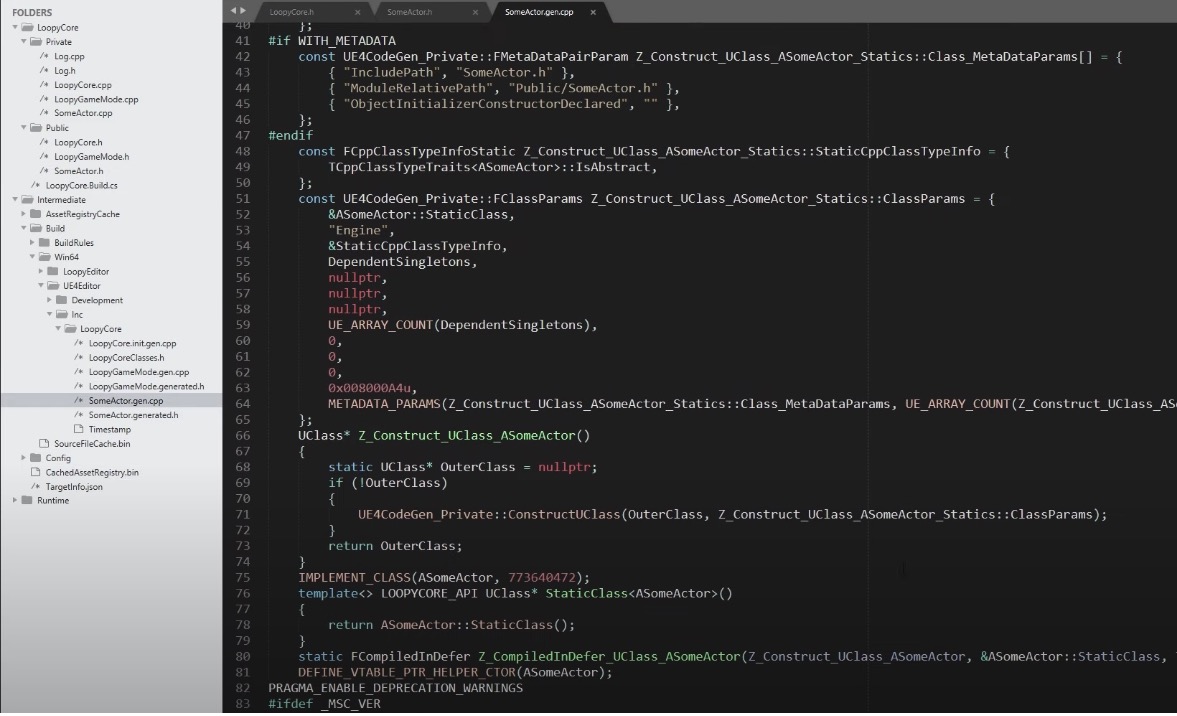
First, the engine registers any UObject classes that are defined in that module. This makes the reflection system aware of these classes.
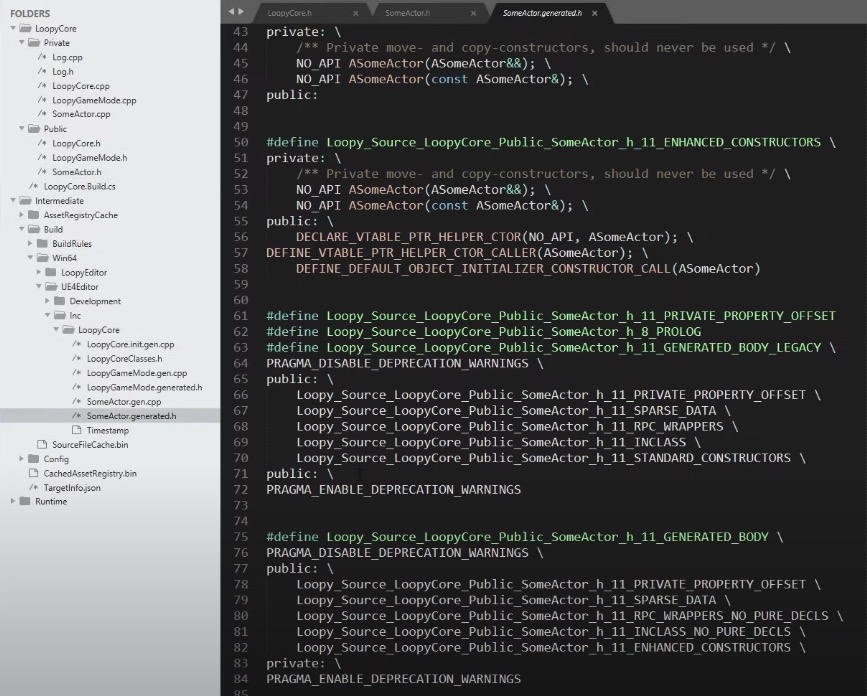
And it also constructs a CDO, or class default object, for each class. The CDO is a record of your class in its default state, and it serves as a prototype for further inheritance.
So if you’ve defined a custom Actor type, or a custom Game Mode, or anything declared with UCLASS in front of it, the engine loop allocates a default instance of that class, then runs its constructor, passing in the CDO of the parent class as a template. This is one of the reasons why the constructor shouldn’t contain any gameplay-related code: it’s really just for establishing the universal details of the class, not for modifying any particular instance of that class.
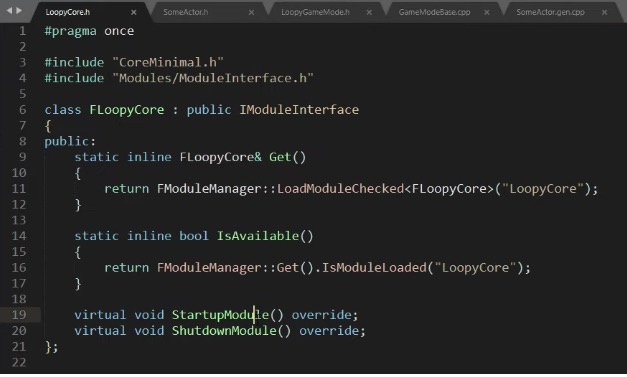
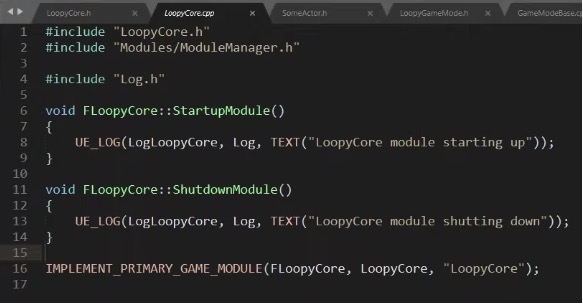
After all your classes are registered, the engine calls your module’s StartupModule function, which is matched with ShutdownModule, giving you a chance to handle any initialization that needs to be tied to the lifetime of the module.
So at this point, the engine loop has loaded all the required engine, project, and plugin modules, registered classes from those modules, and initialized all the low-level systems that need to be in-place. That finishes the PreInit stage.
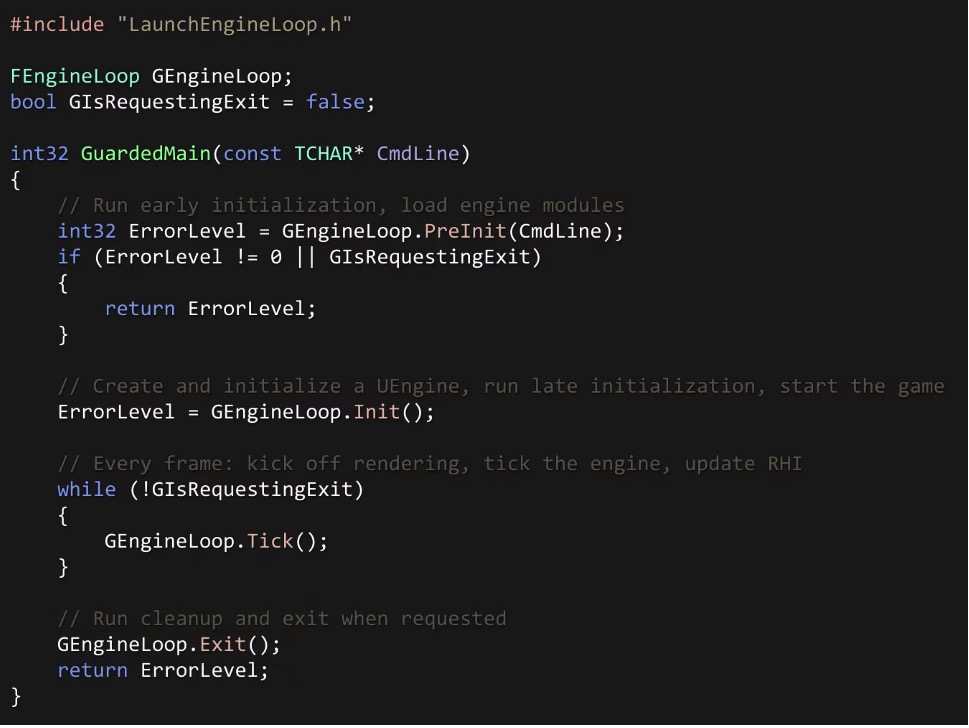
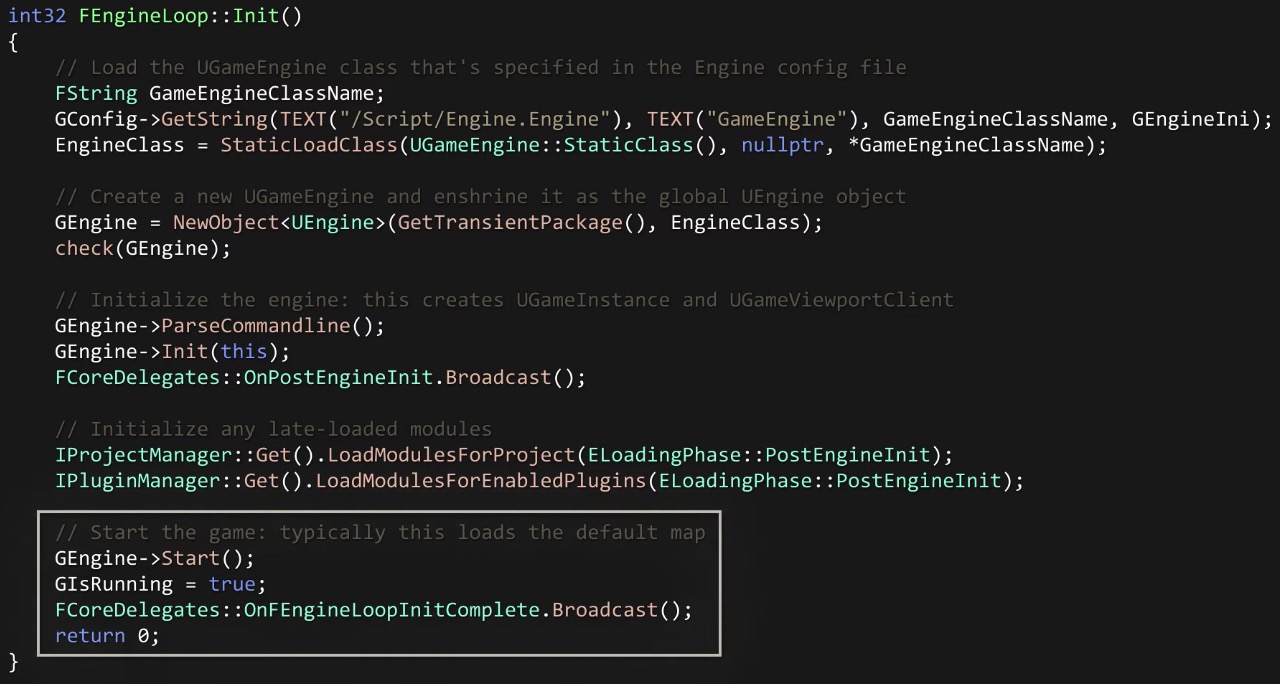
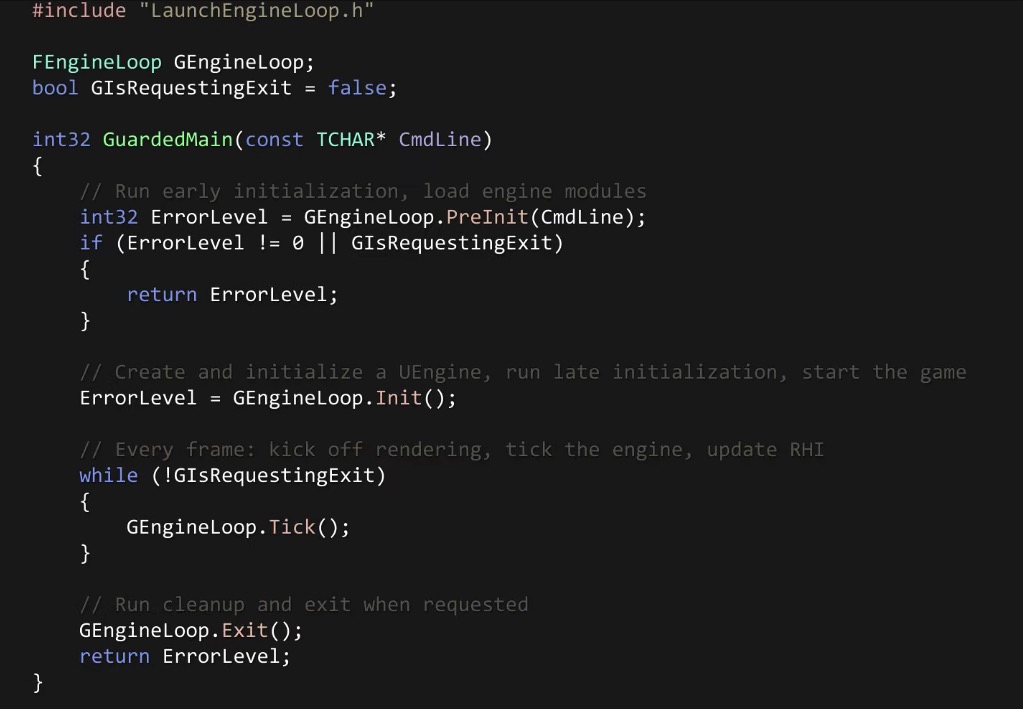
Next, we can move on to the Init function. The Engine loop’s init function is comparatively straightforward. If we simplify it just a little, we can see that it hands strings off to a class called UEngine. Prior to this point, when I’ve said “engine”, we’ve been talking about the engine with a lowercase e, basically, the executable that we’re starting up, consisting of code that we didn’t write ourselves.
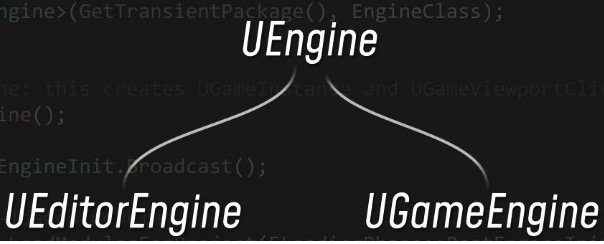
Here we’re introducing the Engine, capital E Engine, the engine is a software product, and it consists a source module named Engine, and in that module is a header called Engine.h, and in that header is defined a class called UEngine, which is implemented in both UEditorEngine and UGameEngine flavors.


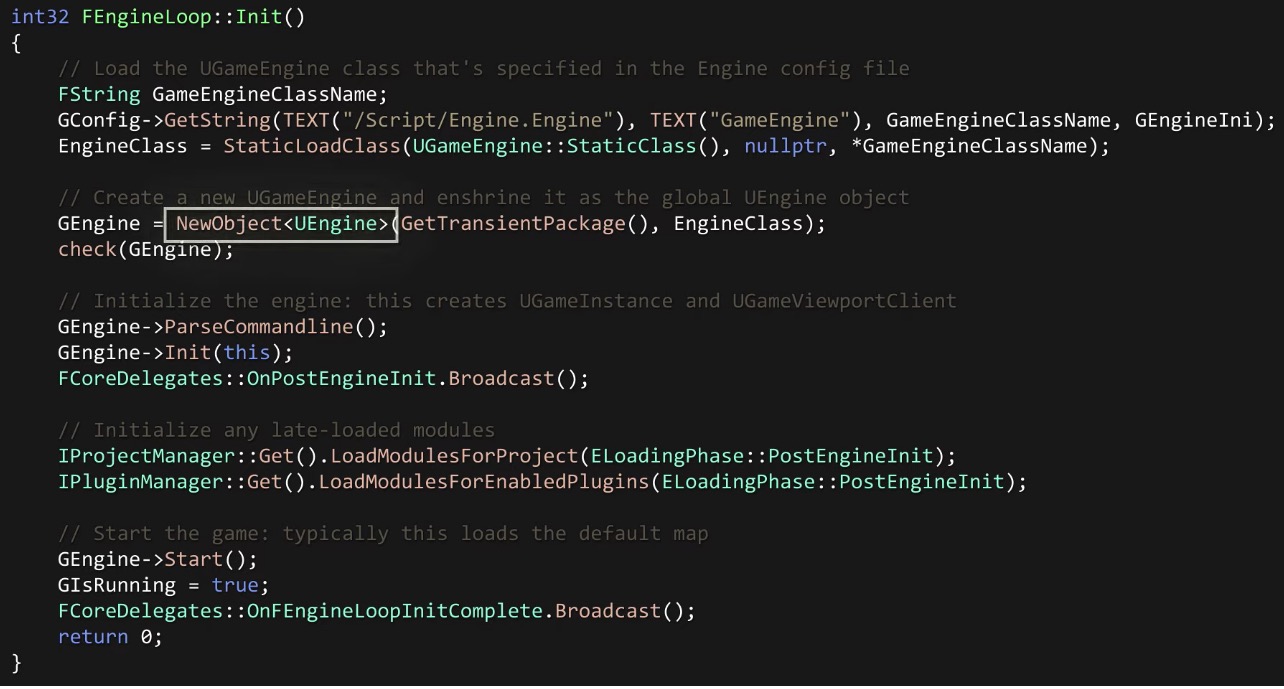
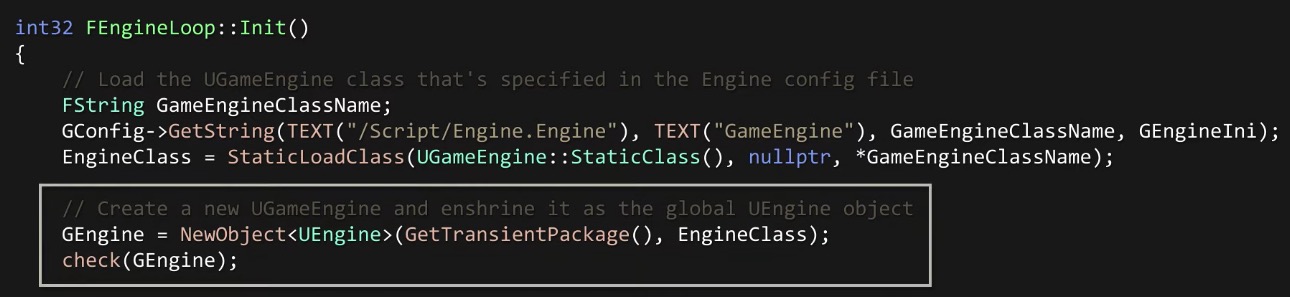
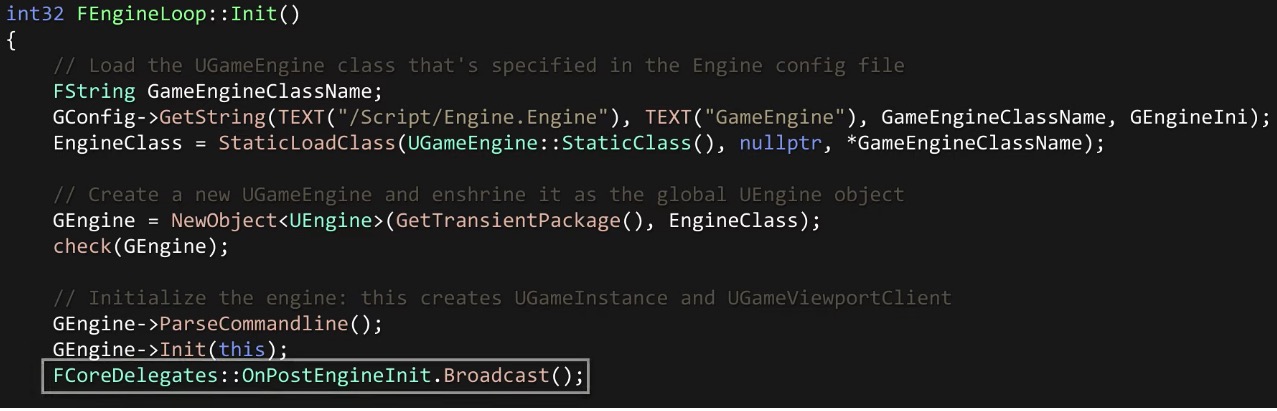
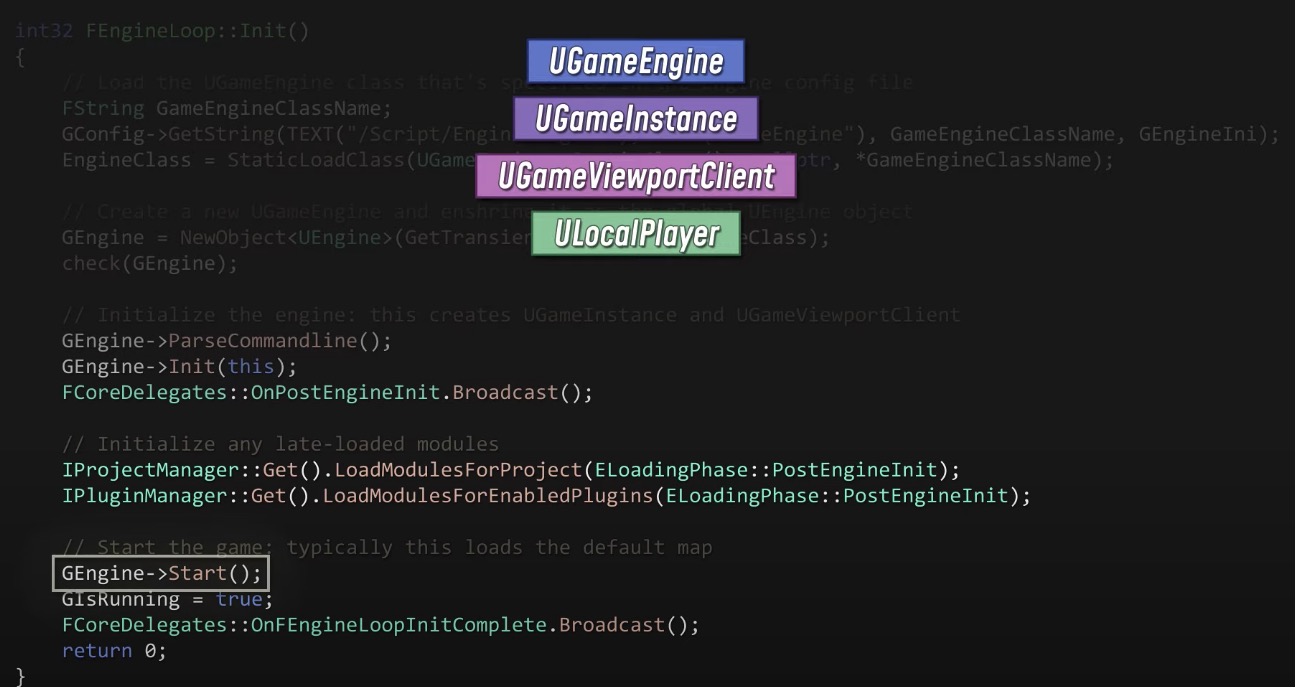
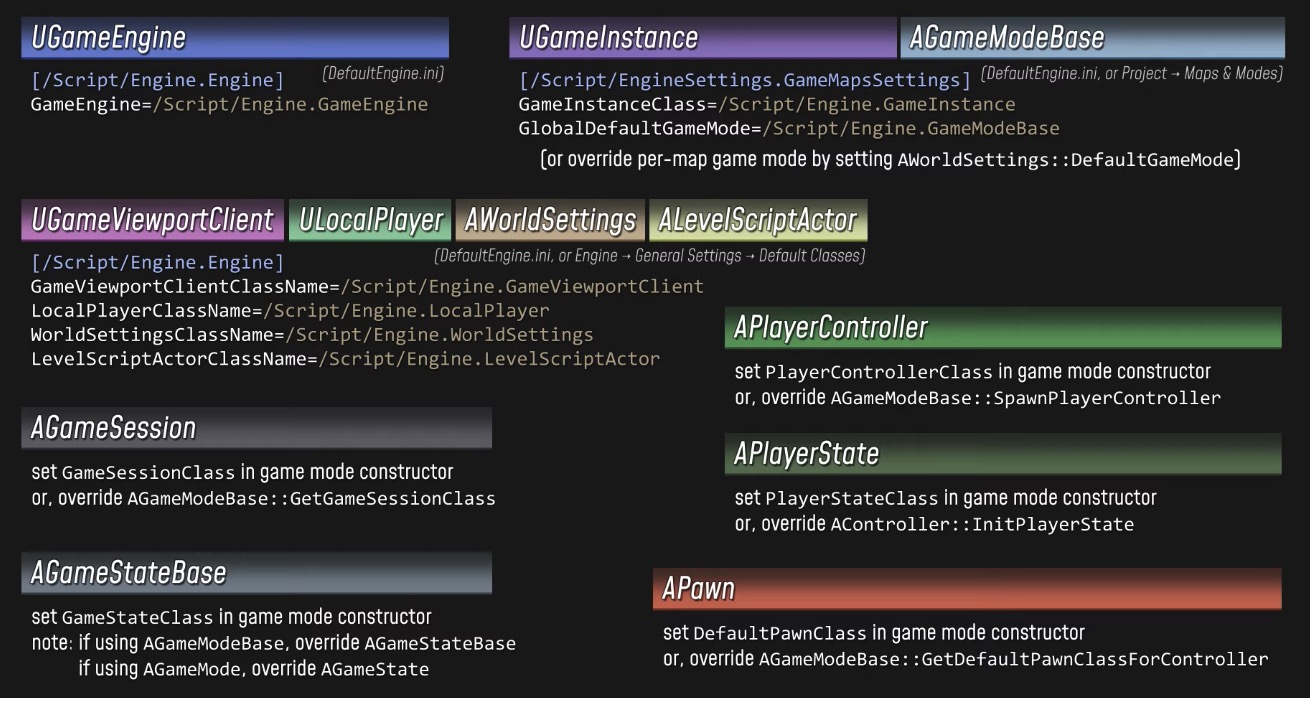
During the init phase for a game, FEngineLoop checks the Engine config file to figure out which GameEngine class should be used.
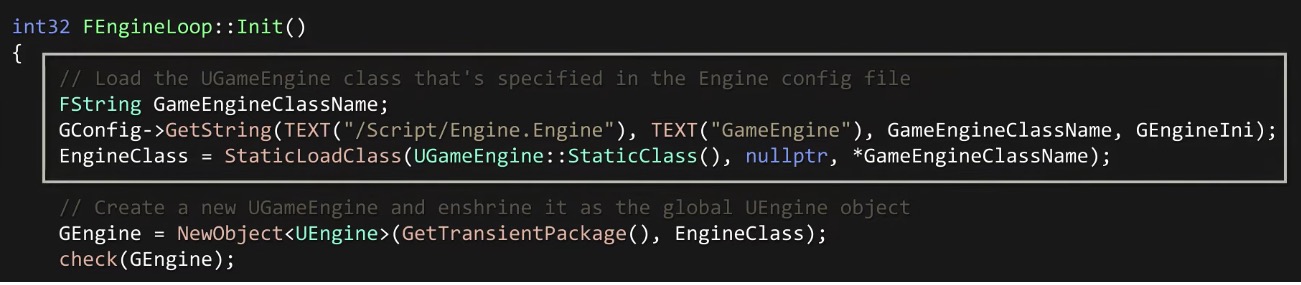
Then it creates an instance of that class and enshrines it as a global UEngine instance, accessible via the global variable GEngine, which is declared in Engine/Engine.h
Once the Engine is created, initialized, the engine loop fires a global delegate to indicate that the Engine is now initialized.
And then it loads any project or plugin modules that have been configured for late loading.

Finally, the Engine is started, and initialization is complete.
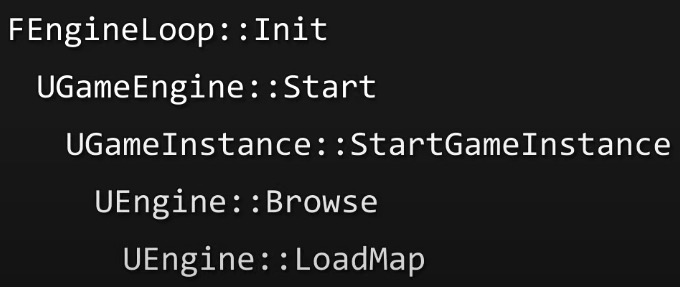
So what does the Engine class actually do? It does a lot of things, but its main responsibility lies in this set of big, fat functions here, including Browse and LoadMap.
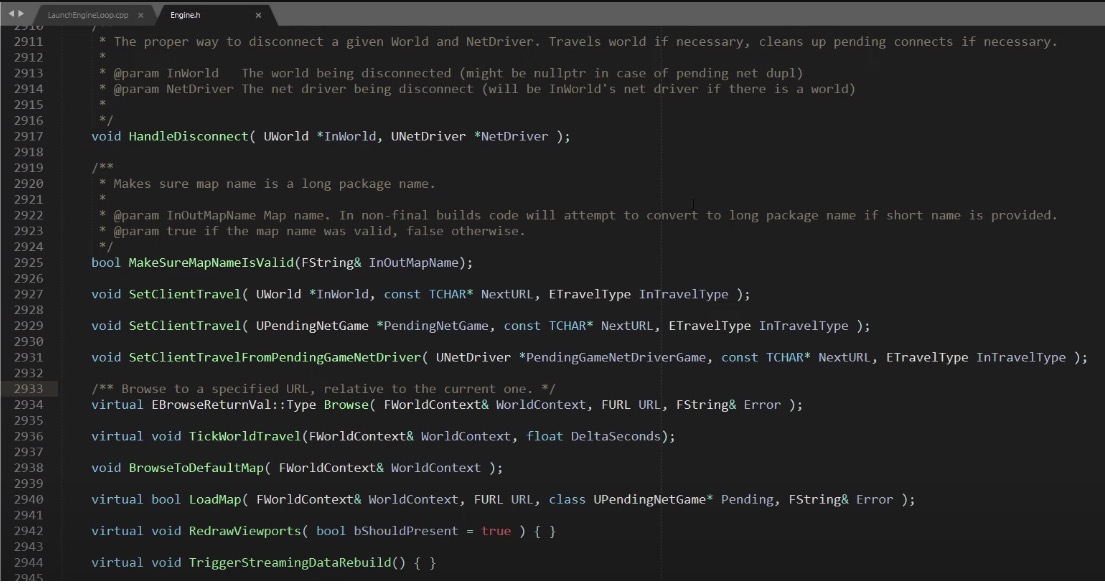
We’ve looked at how the process boots up and gets all the engine systems initialized, but in order to get into an actual game and start playing, we have to load into a map, and it’s the UEngine class that makes this happen for us.
The Engine is able to Browse to a URL, which can represent either a server address to connect to as a client, or the name of a map to load up locally, URLs can also have arguments added onto them.
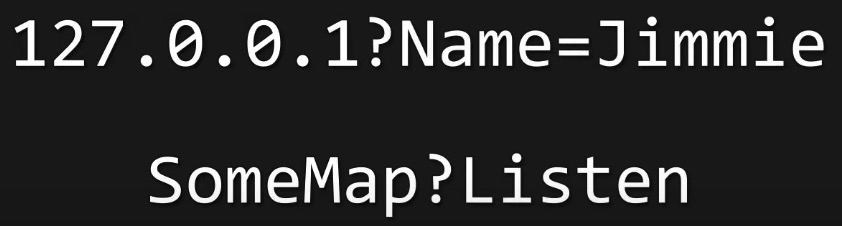
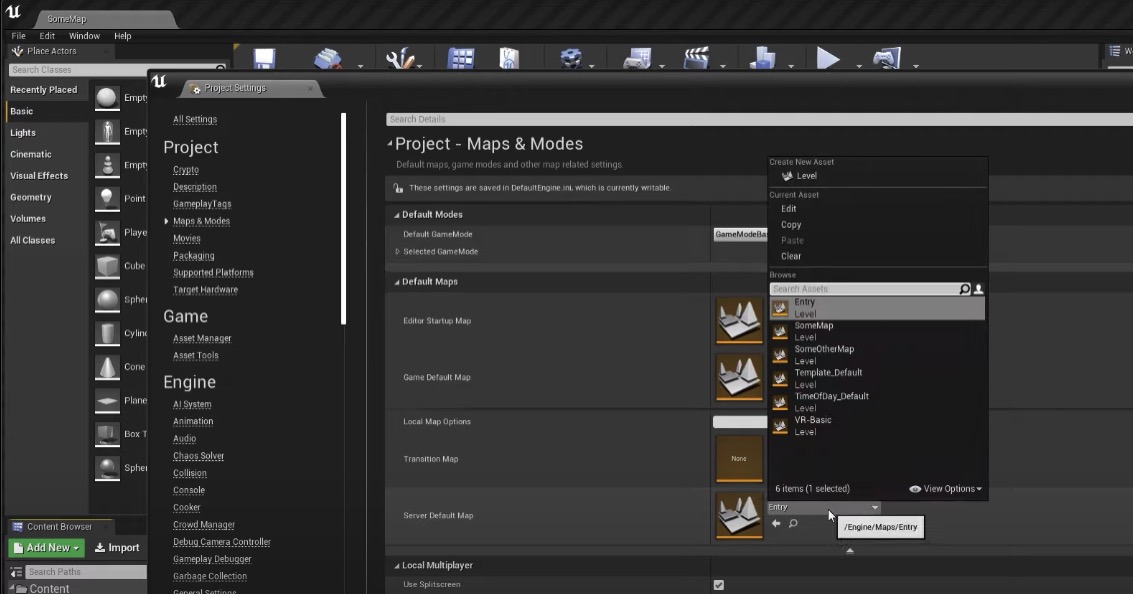
When you set a default map in your project’s DefaultEngine.ini file, you’re telling the Engine to browse to that map automatically when it boots up.
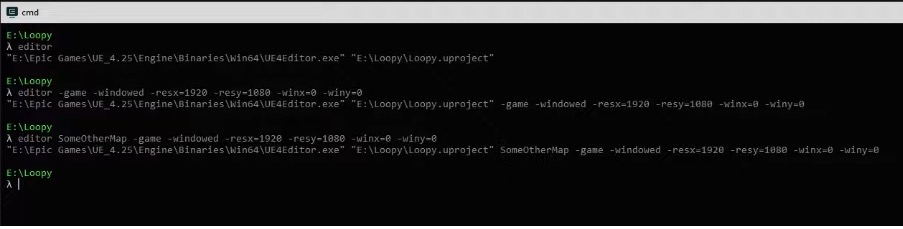
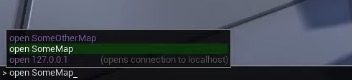
Of course, in development builds, you can also override that default map by supplying a URL at the command-line, and you can also use the open command to browse to a different server or map during gameplay.
So let’s look at the Engine initialization.

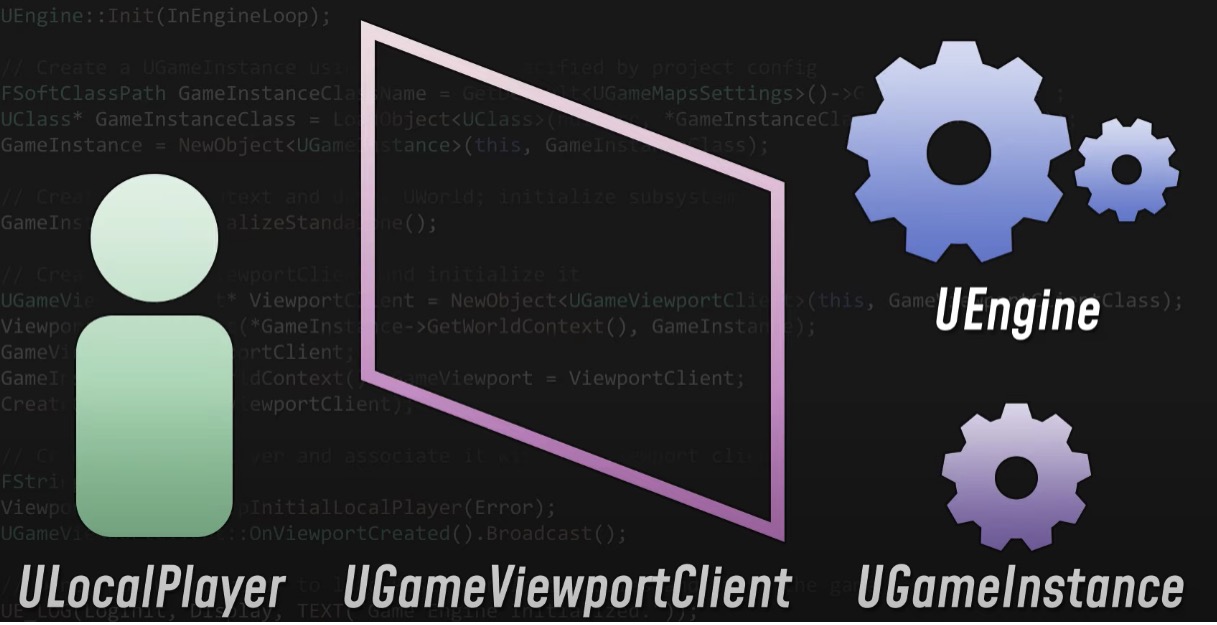
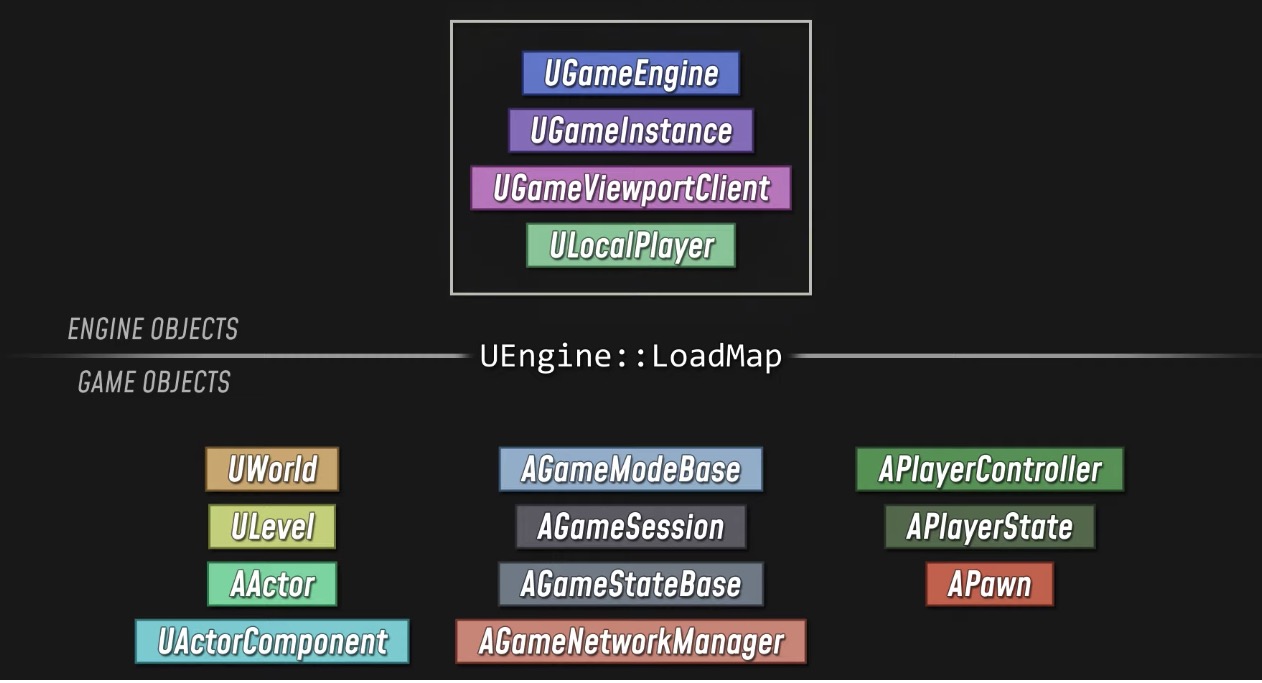
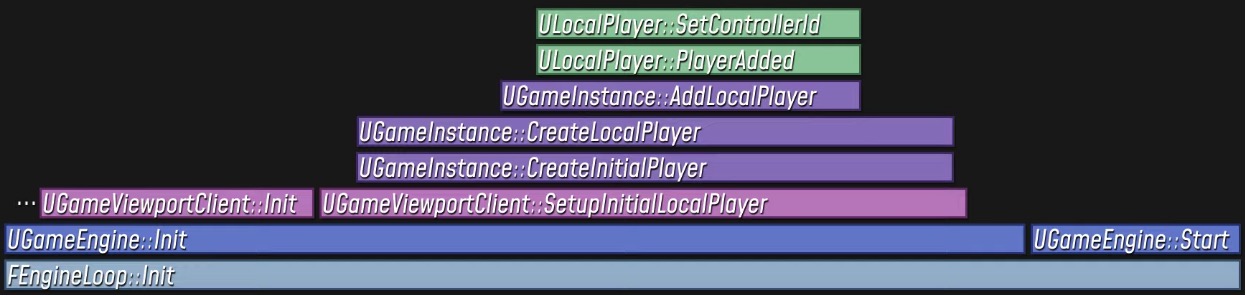
The Engine initializes itself before the map is loaded, and it does so by creating a few important objects: a GameInstance, a GameViewportClient, and a LocalPlayer.
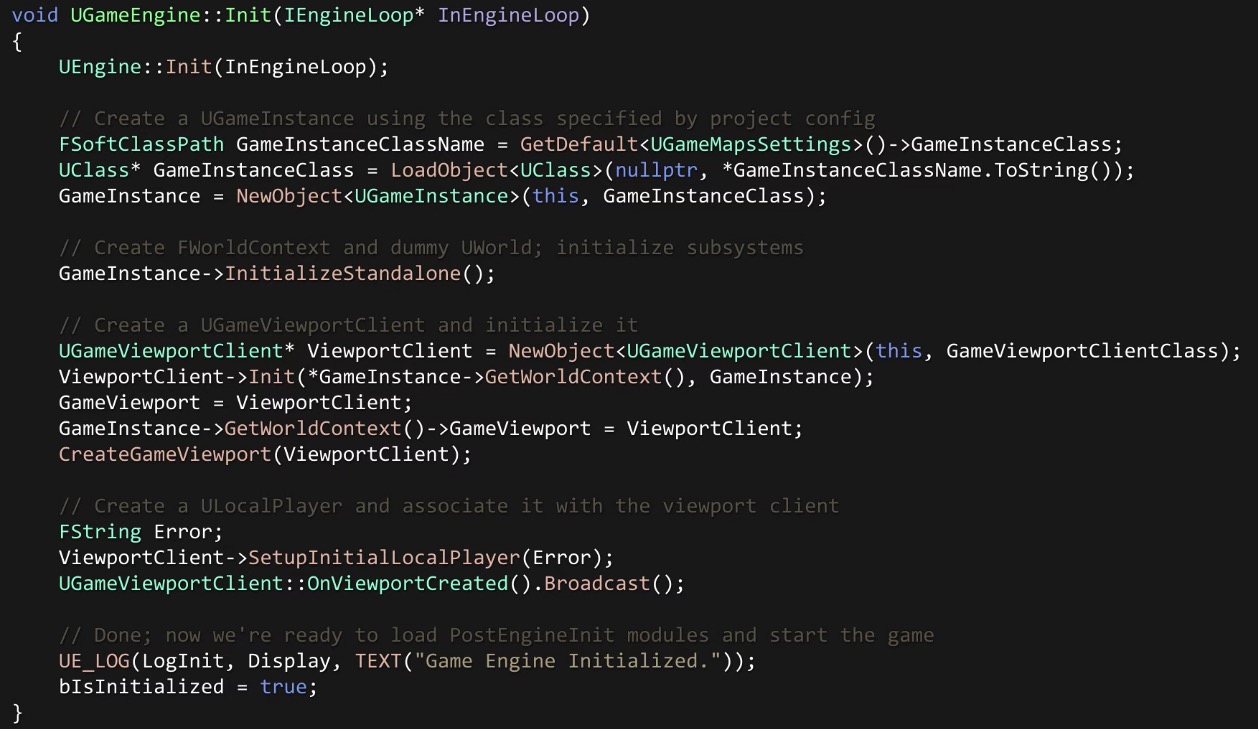
You can think of the LocalPlayer as representing the user who’s sitting in front of the screen, and you can think of the viewport client as the screen itself: it’s essentially a high-level interface for the rendering, audio, and input systems, so it represents the interface between the user and the Engine. The GameInstance class was added in Unreal 4.4, and it was spun off from the UGameEngine class to handle some of the more project-specific functionality that was previously handled in the Engine.
So after the Engine is initialized, we have a GameInstance, a GameViewportClient, and a LocalPlayer, once that’s done, the game is ready to start:
This is where our initial call to LoadMap occurs.
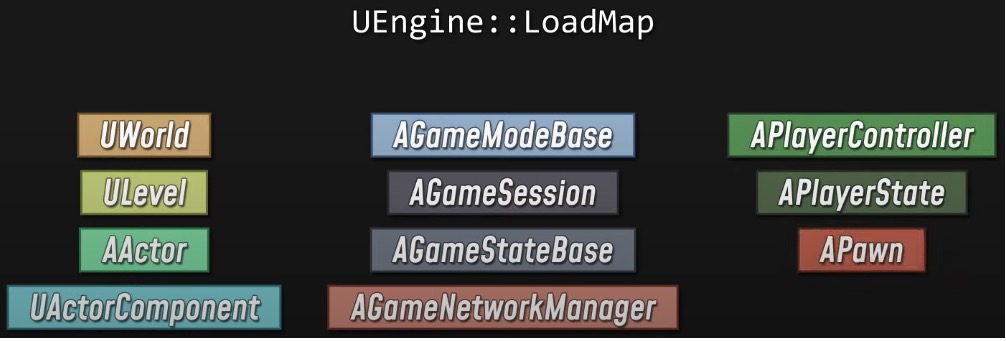
By the end of the LoadMap call, we’ll have a UWorld that contains all the actors that were saved into our map, and we’ll also have a handful of newly-spawned actors that form the core of the GameFramework: that includes a game mode, a game session, a game state, a game network manager, a player controller, a player state and a pawn.
One of the key factors that separates these two sets of objects is lifetime. At high level, there are two different lifetimes to think about: there’s everything that happens before a map is loaded, and then there’s everything that happens after. Everything that happens before LoadMap is tied to the lifetime of the process. Everything else – things like GameMode, GameState, and PlayerController – are created after the map is loaded, and they only stick around for as long as you’re playing in that map.
The Engine does support what it calls “seamless travel”, where you can transition to a different map while keeping certain actors intact. But if you straight-up browse to a new map, or connect to a different server, or back out to a main menu – then all actors are destroyed, the world is cleaned up, and these classes are out of the picture until you load another map.
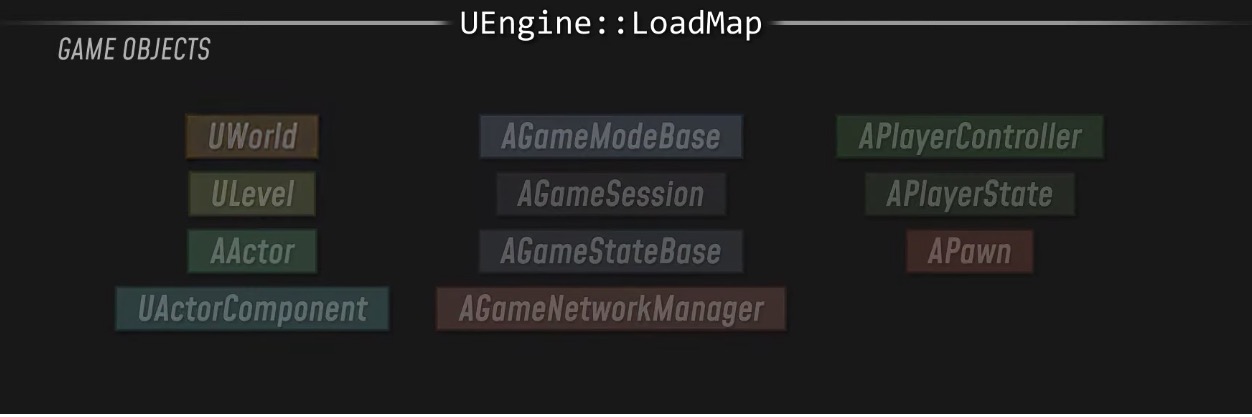
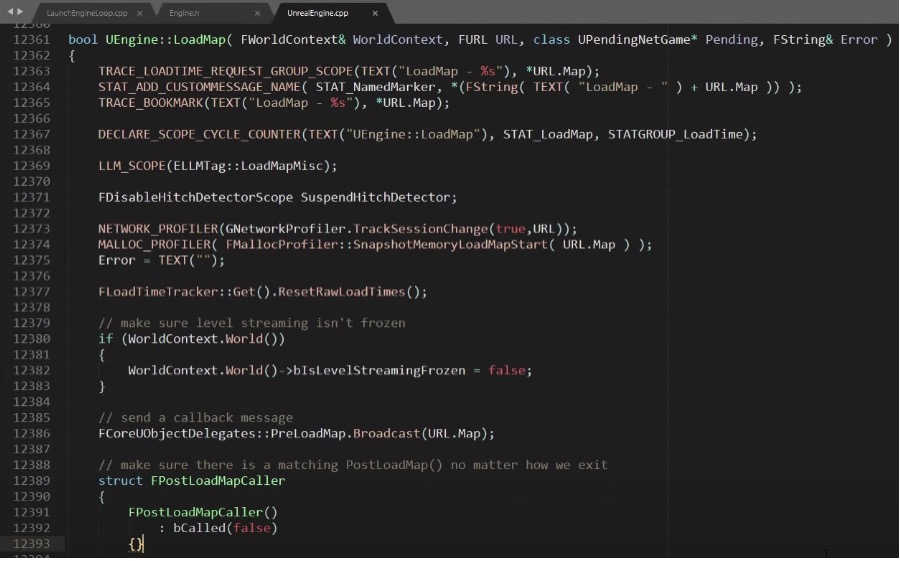
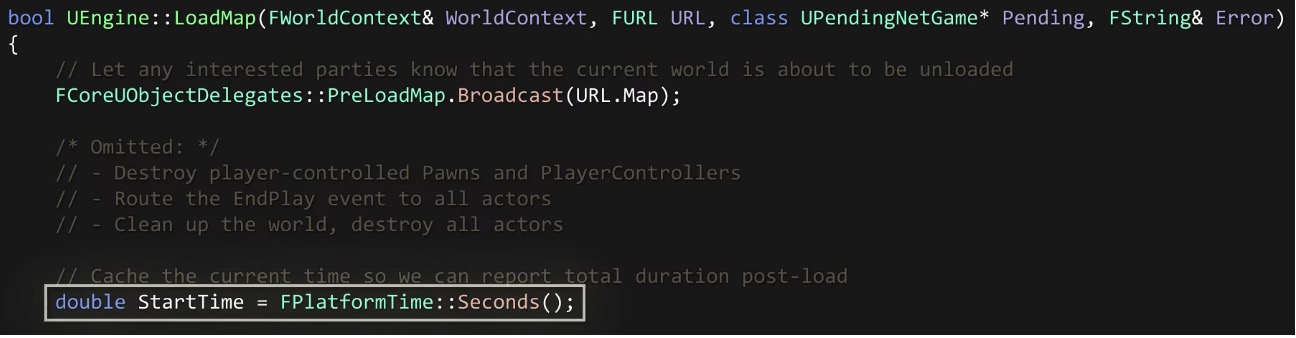
So let’s look at what happens in LoadMap. It’s a complicated function, but if we pare it back to the essentials, it’s not that hard to follow.

First, the Engine fires a global delegate to indicate that the map is about the change. Then if there’s already a map loaded, it cleans up and destroys that world. We’re mostly concerned with initialization right now, so we’ll just wave our hand at that. Long story short, by the time we get here, there’s no World.
What we do have though, is a WorldContext, this object is created by the GameInstance during Engine initialization, and it’s essentially a persistent object that keeps track of whichever world is loaded up at the moment.

Before anything else gets loaded, the GameInstance has a chance to preload any assets that it might want, and by default, that doesn’t do anything.

Next, we need to get ourselves a World. If you’re working on a map in the editor, the editor has a UWorld loaded into memory, along with one or more ULevels, which contain the Actors you’ve placed. When you save your persistent level, that World, its Level, and all its Actors, get serialized to a map package, which is written to disk as a .umap file.
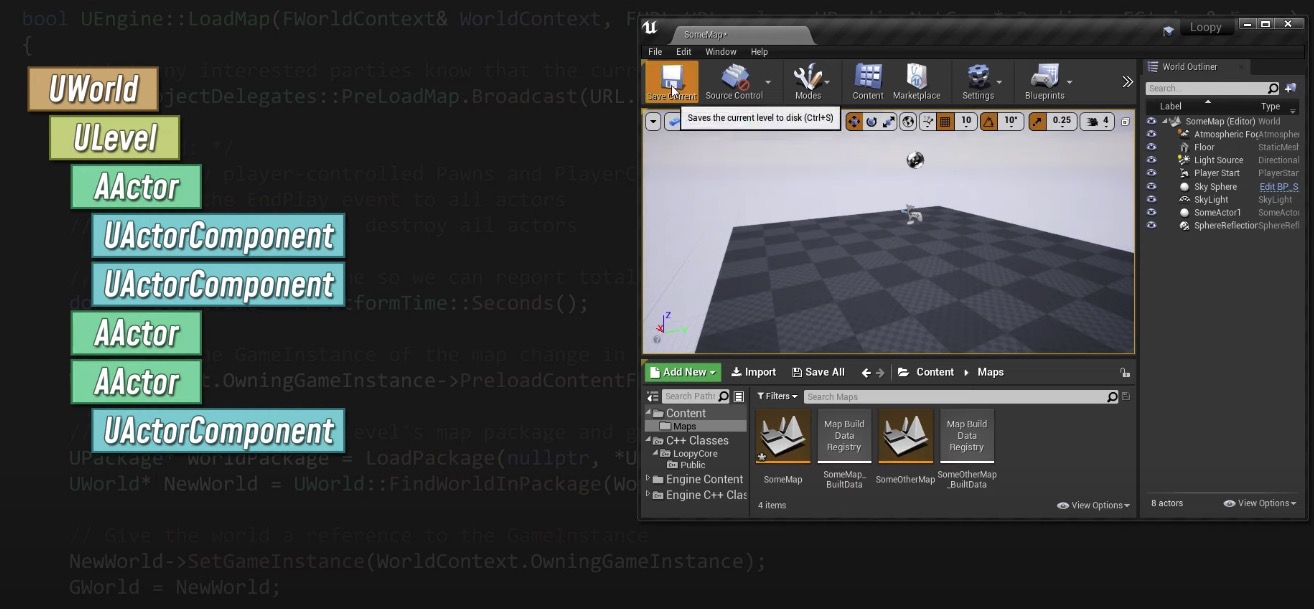
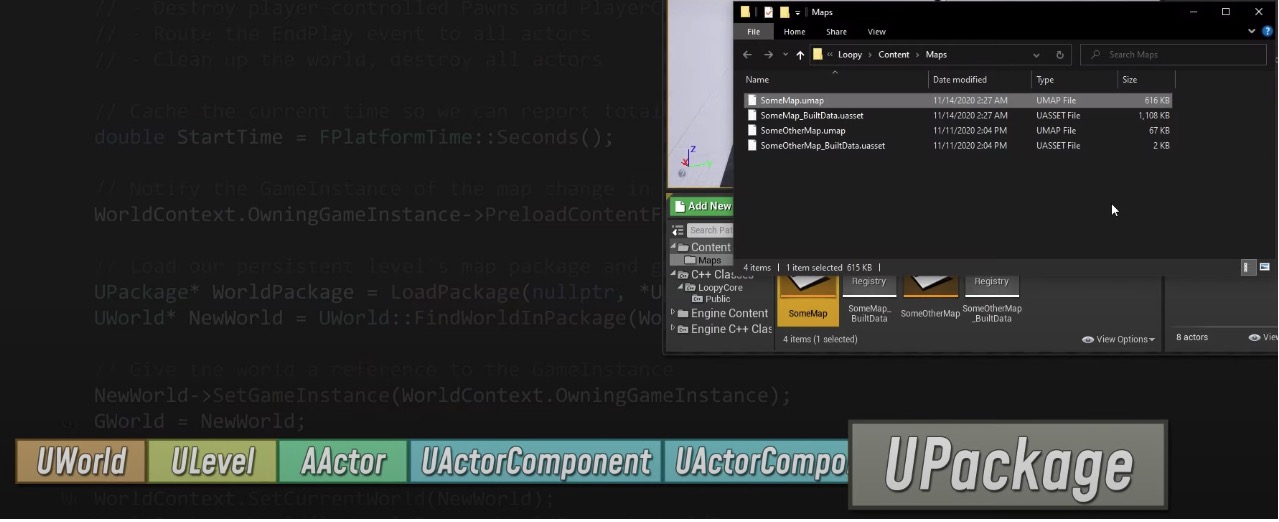
So during LoadMap, the Engine finds that map package and loads it. At this point, the World, its persistent level, and the actors in that persistent level, and the actors in that level – including the WorldSettings – has been loaded back into memory.

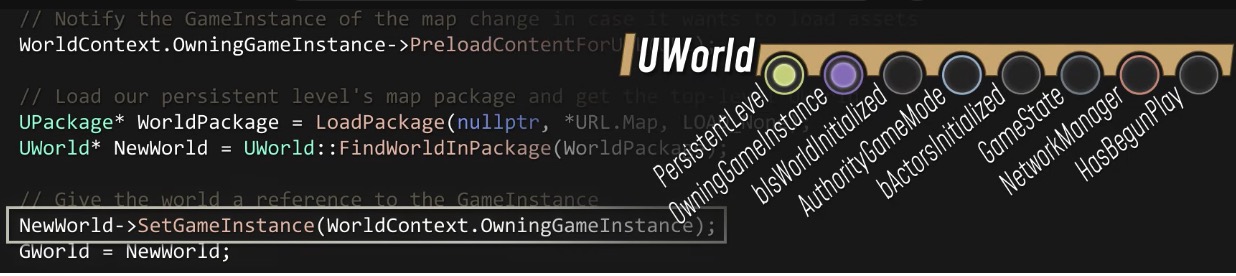
So, we have a World, and now we have to initialize it.

The Engine gives the World a reference to the GameInstance, and then it initializes a global GWorld variable with a reference to the World.
Then the World is installed into the WorldContext, it has its world type initialized to Game in this case, and it’s added to the root set, which prevents it from being garbage collected.
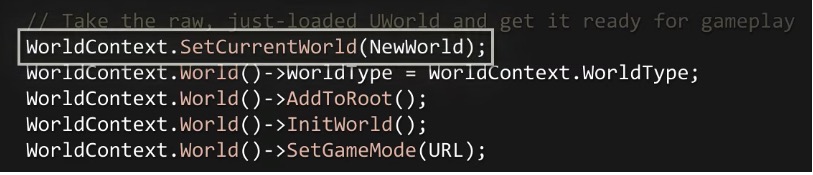
InitWorld allows the world to set up systems like physics, navigation, AI and audio. When we call SetGameMode, the World asks the GameInstance to create a GameMode actor in the world.

Once the GameMode exists, the Engine fully loads the map, meaning any always-loaded sublevels are loaded in, along with any referenced assets.

Next, we come to InitializeActorsForPlay. This is what the Engine refers to as “bringing the world up for play”.

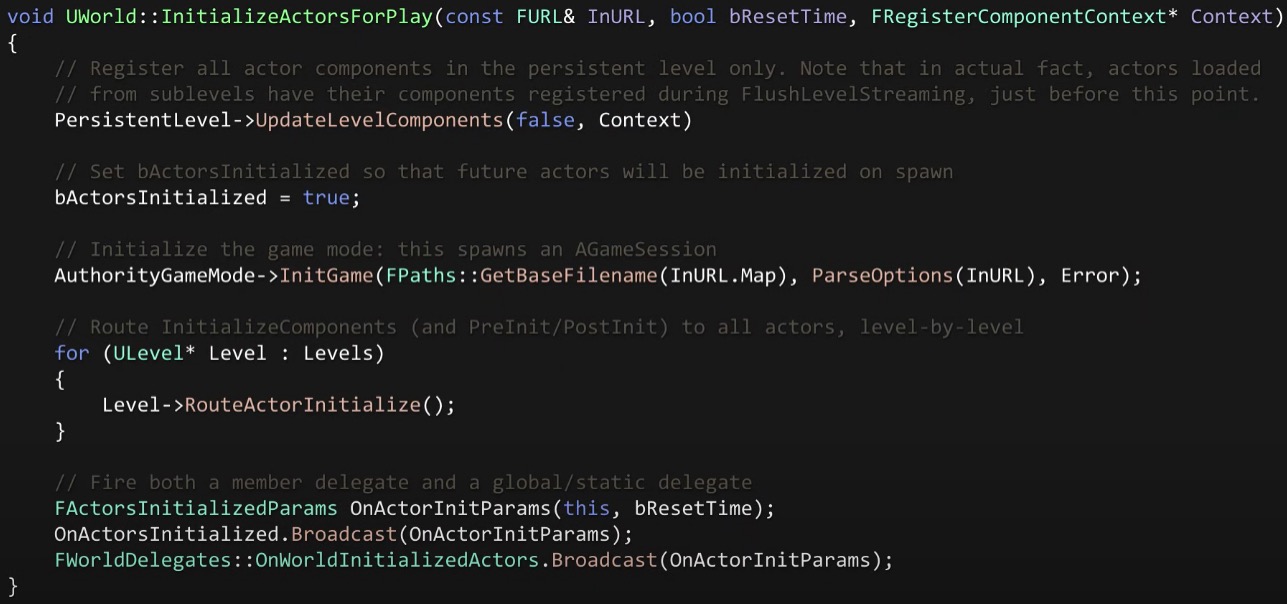
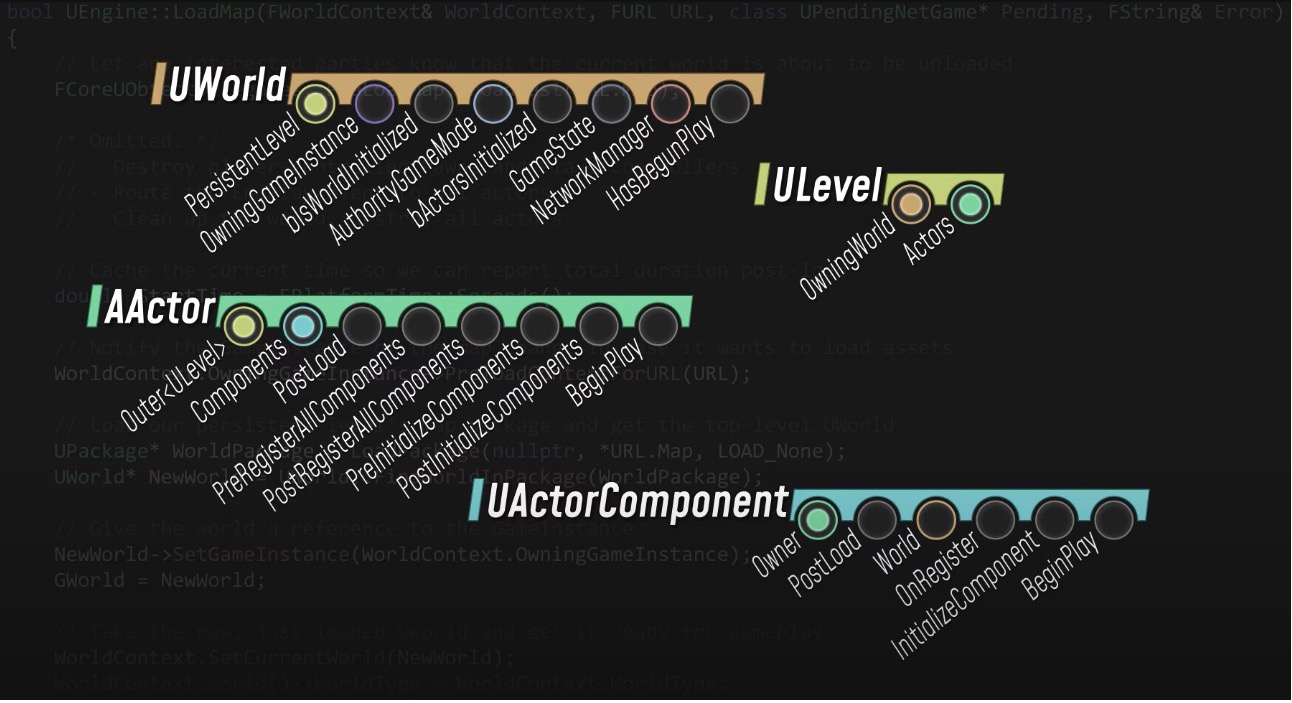
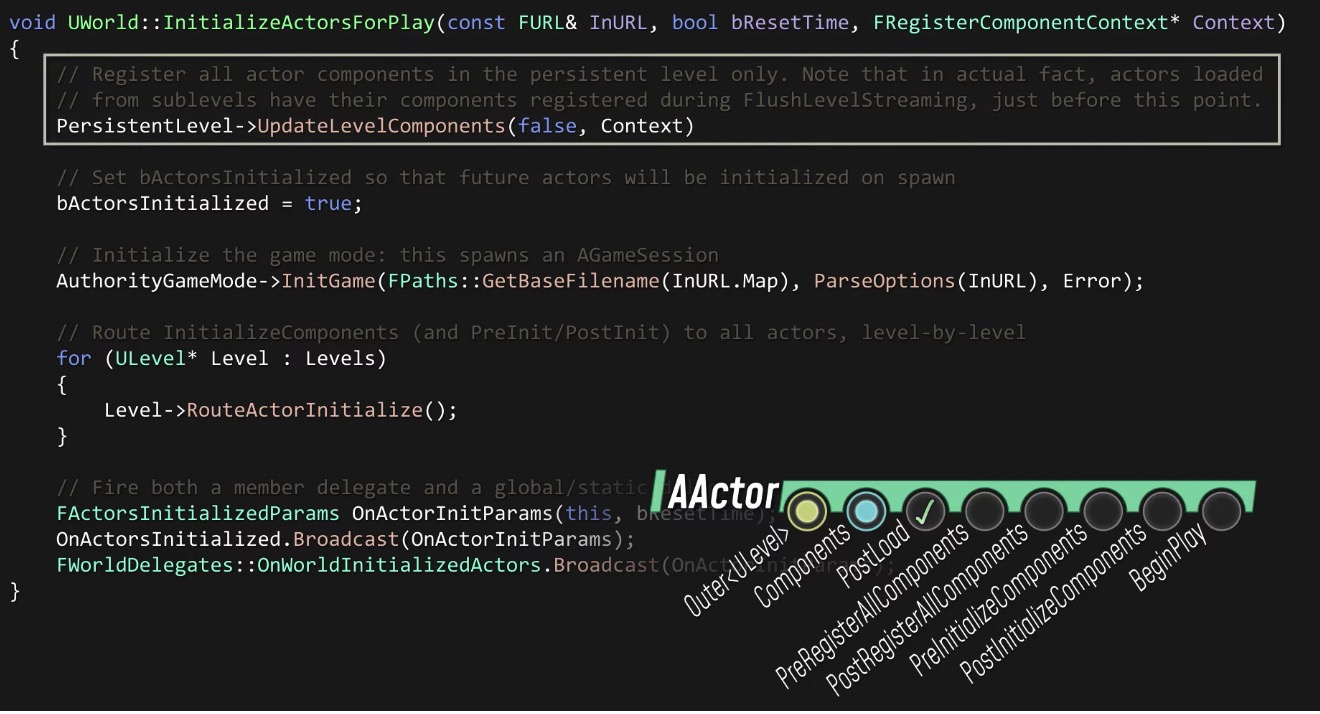
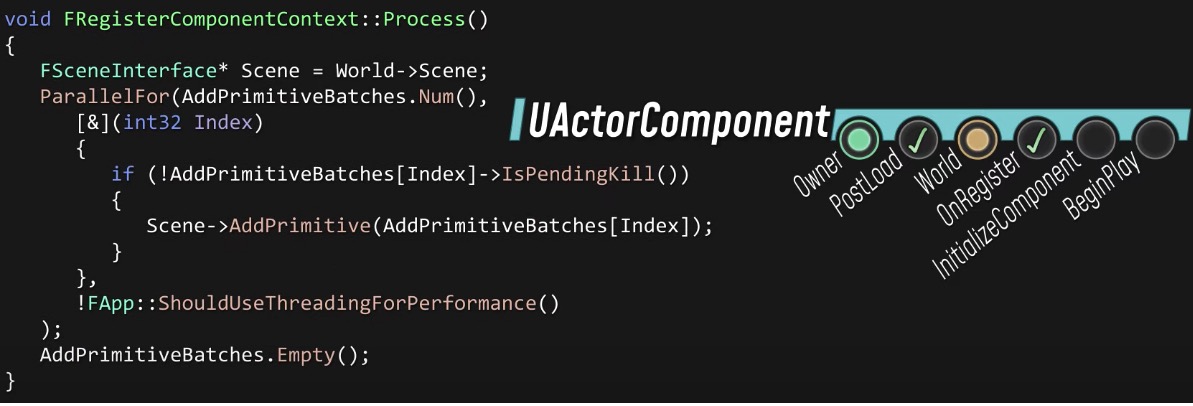
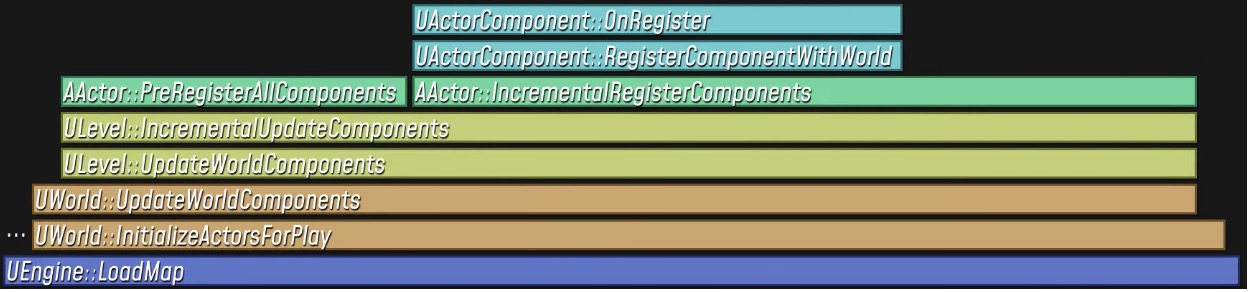
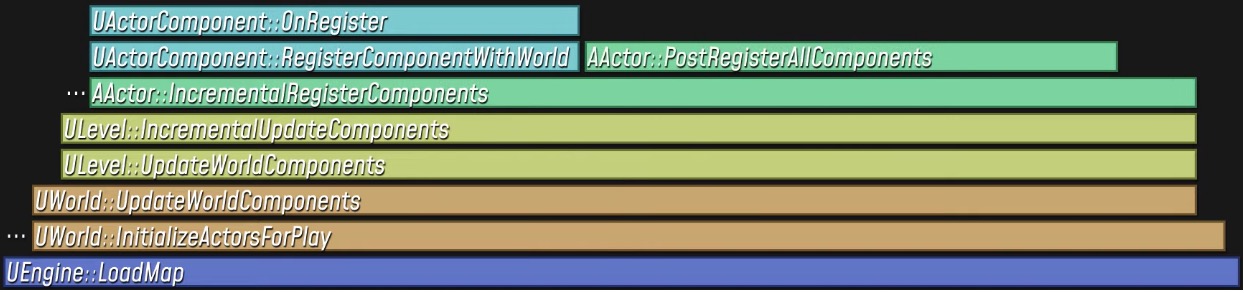
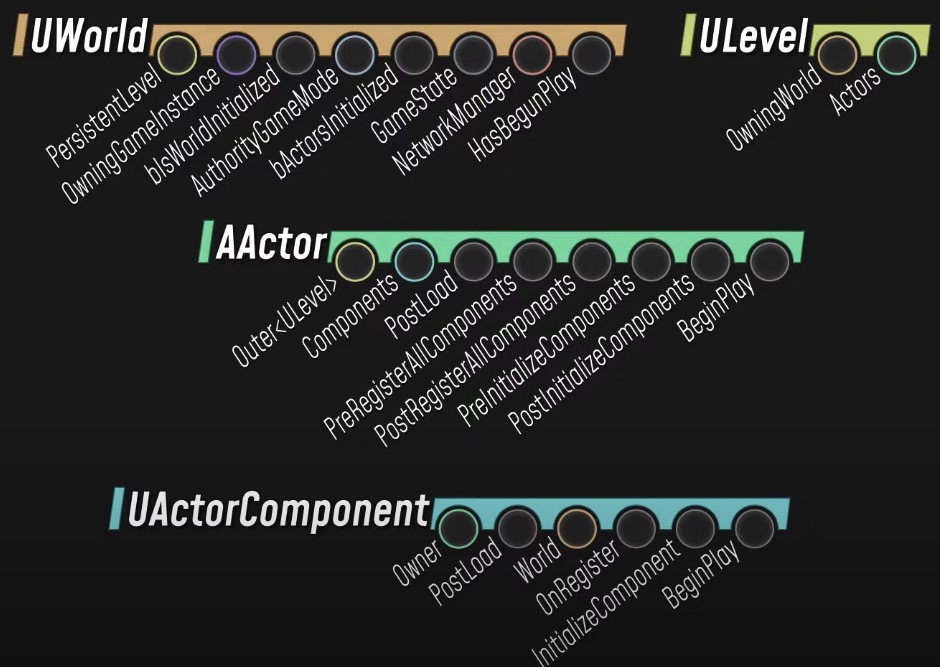
Here the World iterates over all actors in a few different loops. The first loop registers all actor components with the world. Every ActorComponent within is registered, which does three important things for the component:
First, it gives it a reference to the world that it’s been loaded into.
Next, it calls the component’s OnRegister function, giving it a chance to do any early initialization.
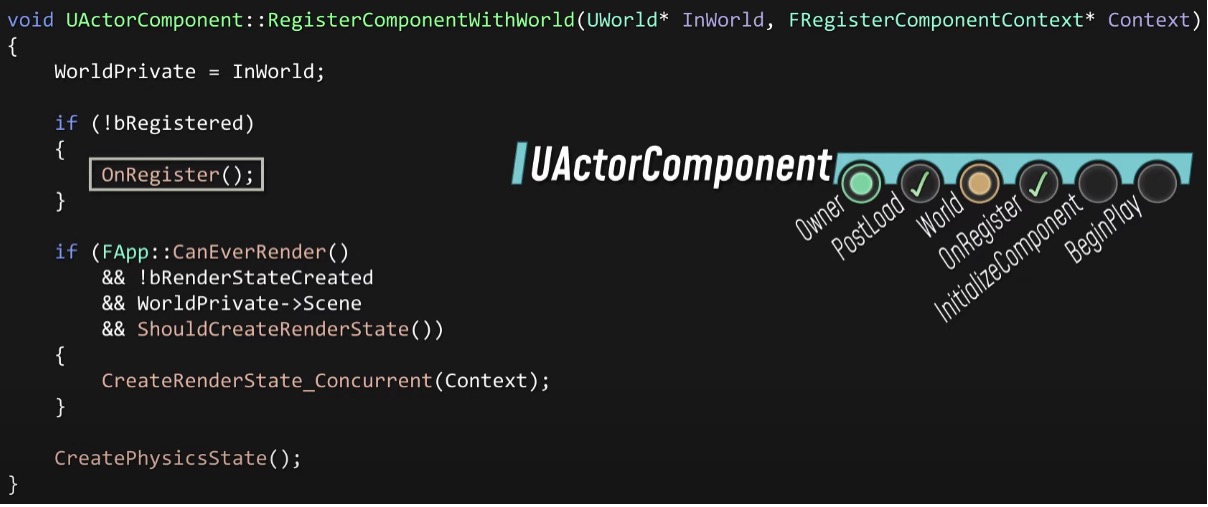
And, if it’s a PrimitiveComponent, when all is set and done, after registration, the component will have a FPrimitiveSceneProxy created and added to the FScene, which is the render thread’s version of the UWorld.
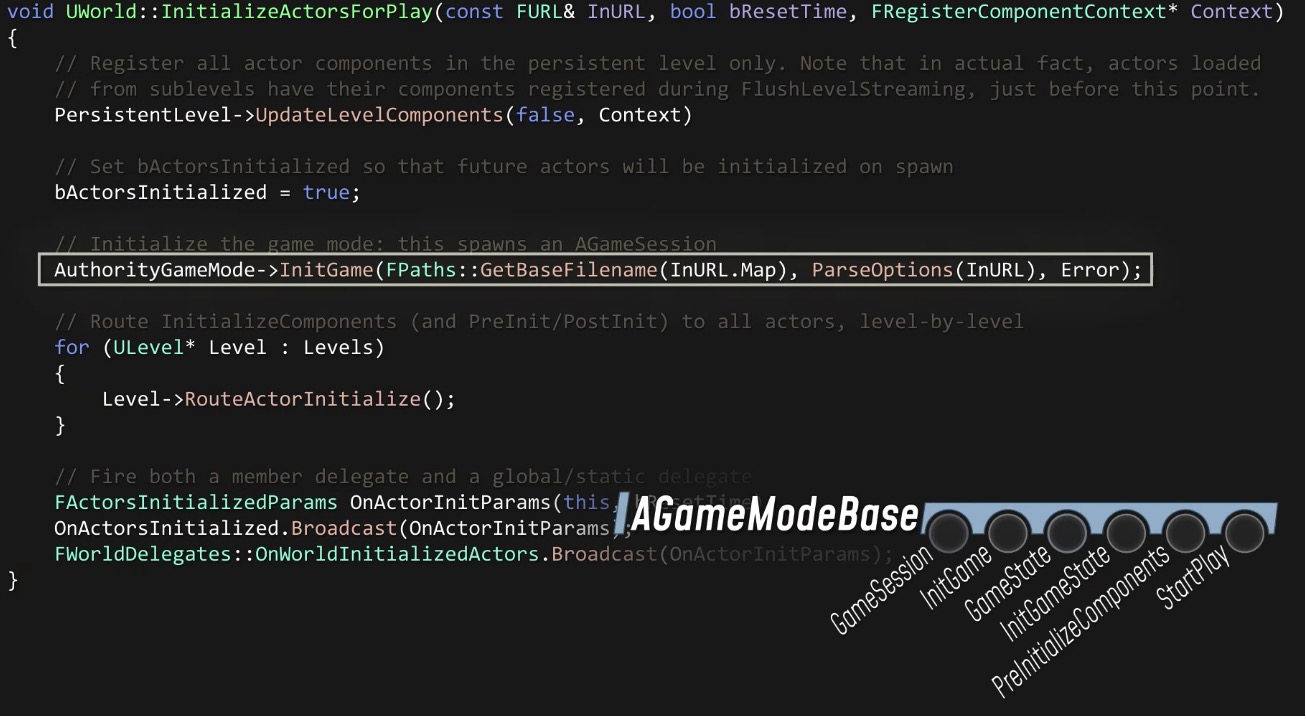
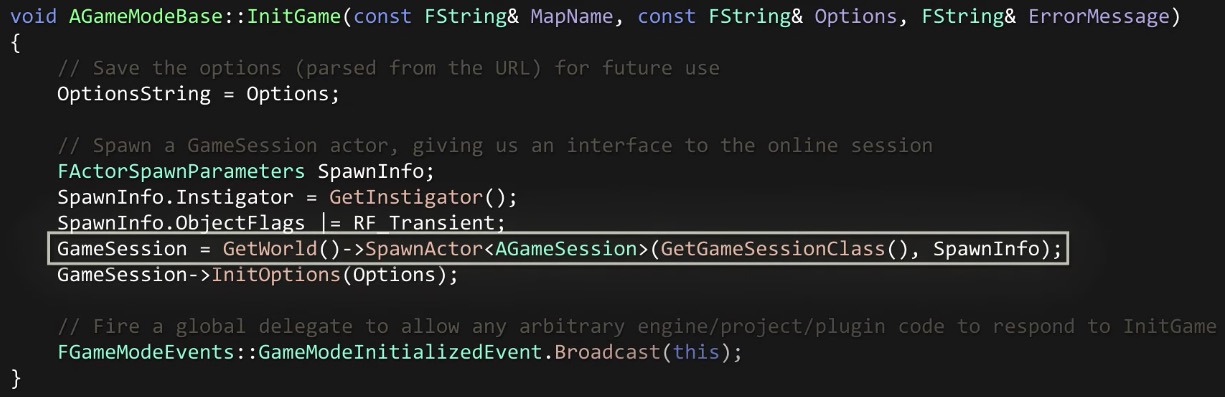
Once components have been registered, the World calls the GameMode’s InitGame function. That causes the GameMode to spawn a GameSession actor.
After that, we have another loop where the world goes level-by-level, and has each level initialize all its actors. That happens in two passes.
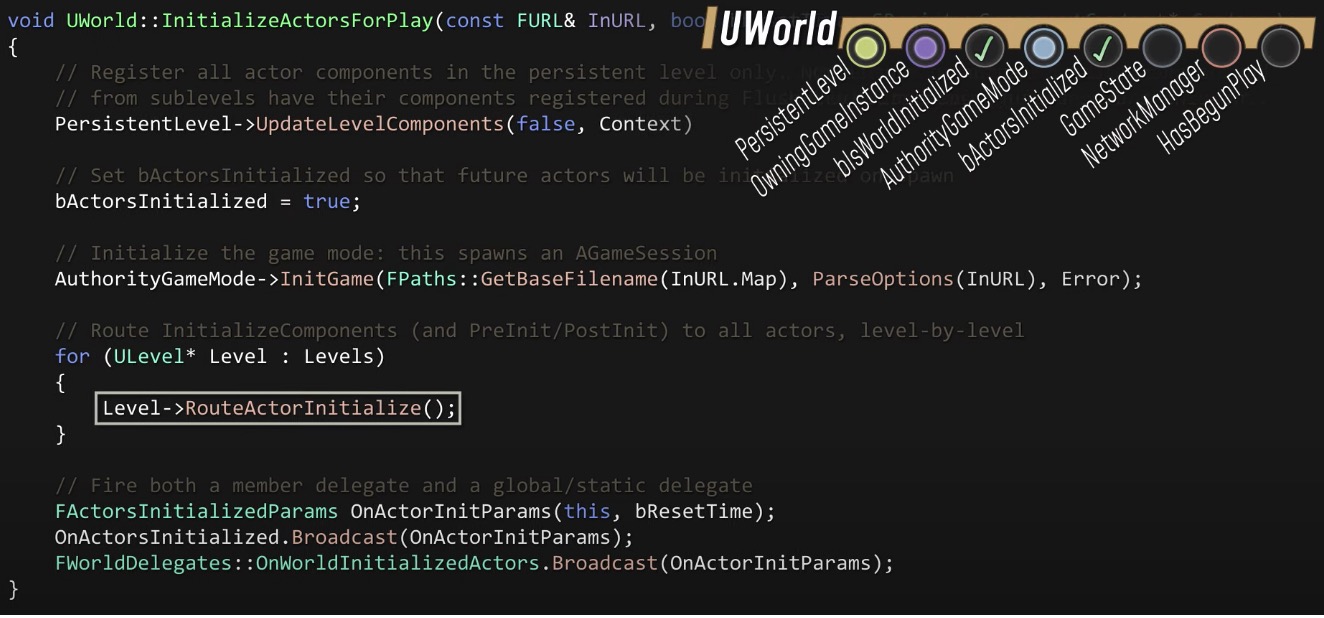
In the first pass, the Level calls the PreInitializeComponents function on each Actor. This gives Actors a chance to initialize themselves fairly early, at a point after their components are registered but before their components have been initialized.
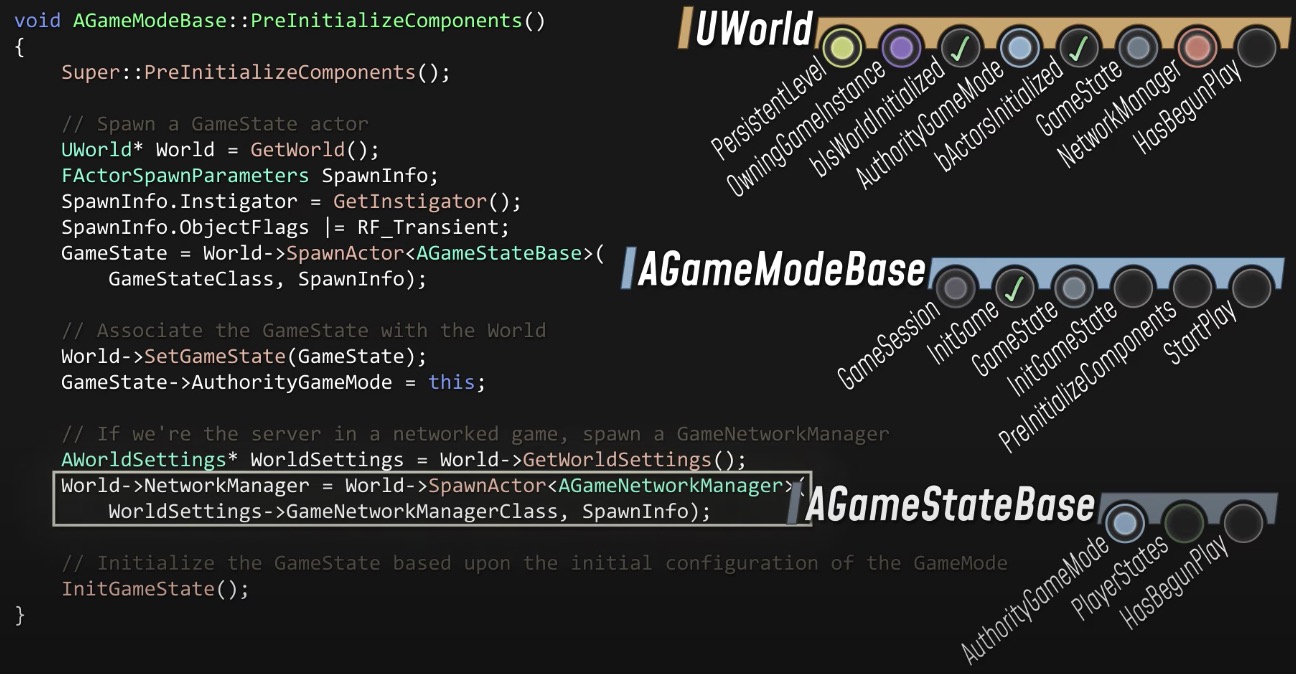
The GameMode is an actor like any other, so its PreInitializeComponents function is called here too. When that happens, the GameMode spawns a GameState object and associates it with the World, and it also spawns a GameNetworkManager, before finally calling the game mode’s InitGameState function.
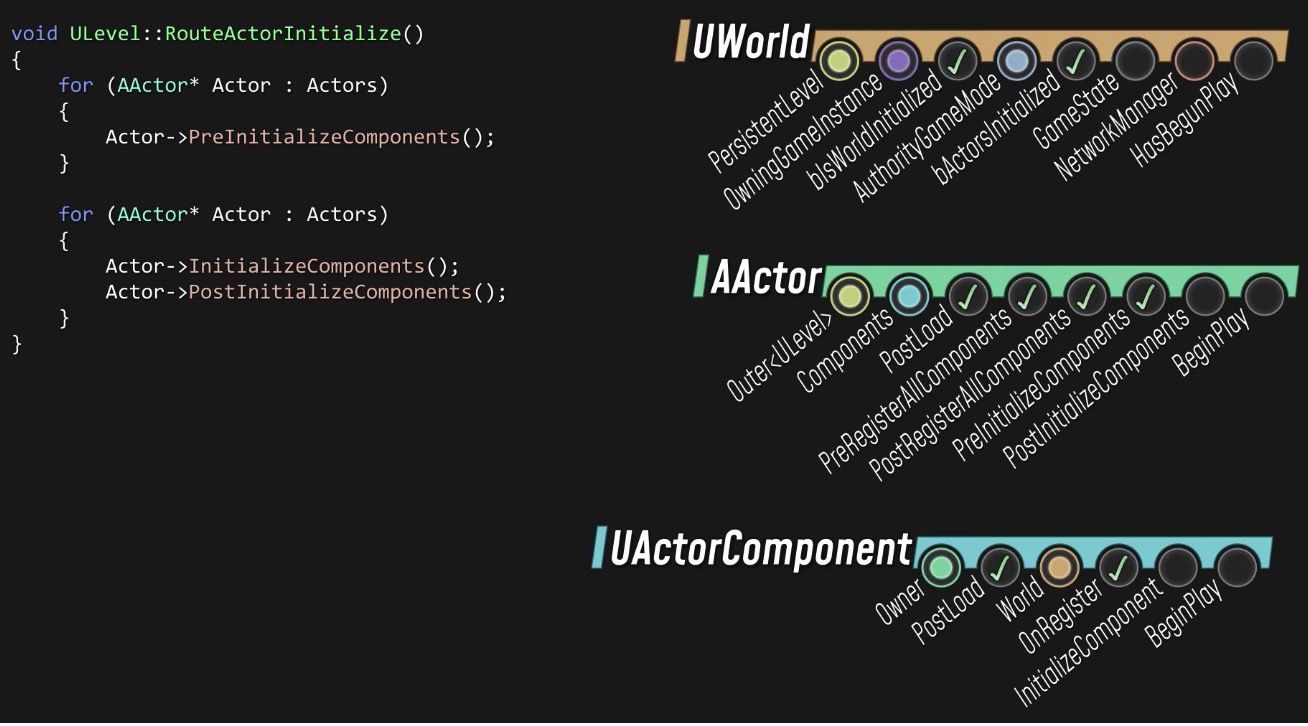
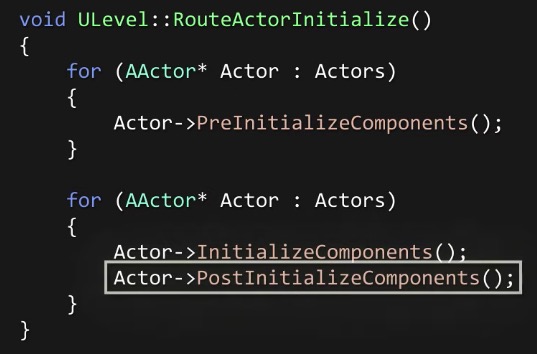
Finally, we finish by looping over all actors again, this time calling InitializeComponents, followed by PostInitializeComponents.
InitializeComponents loops over all the Actor’s components and checks two things: If the component has bAutoActivate enabled, then the component will be activated. And if the component has bWantsInitializeComponent enabled, then its InitializeComponent function will be called.

PostInitializeComponents is the earliest point where the actor is in a fully-formed state, so it’s a common place to put code that initializes the actor at the start of the game.
At this point, our LoadMap call is nearly done: all actors have been loaded and initialized, the World has been brought up for play, and we now have a set of actors used to manage the overall state of the game.
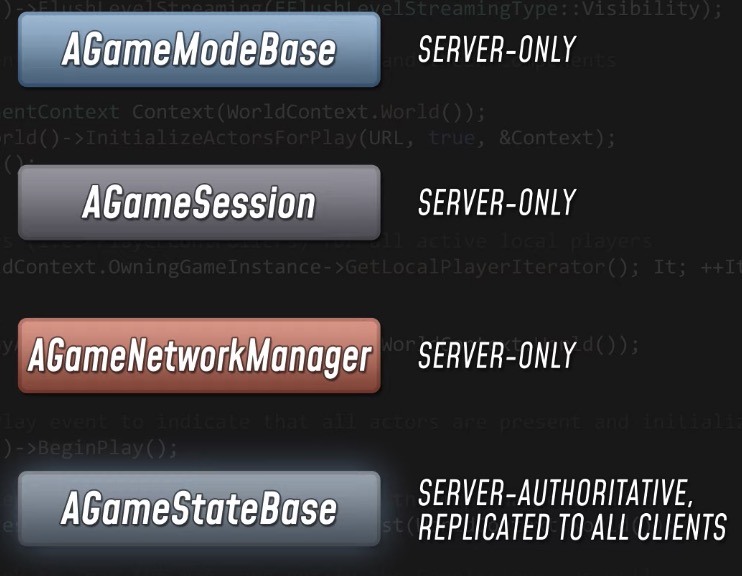
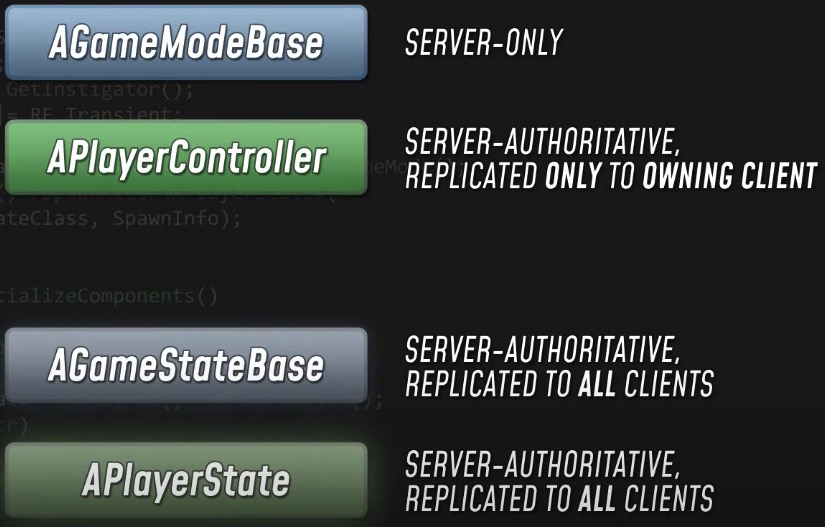
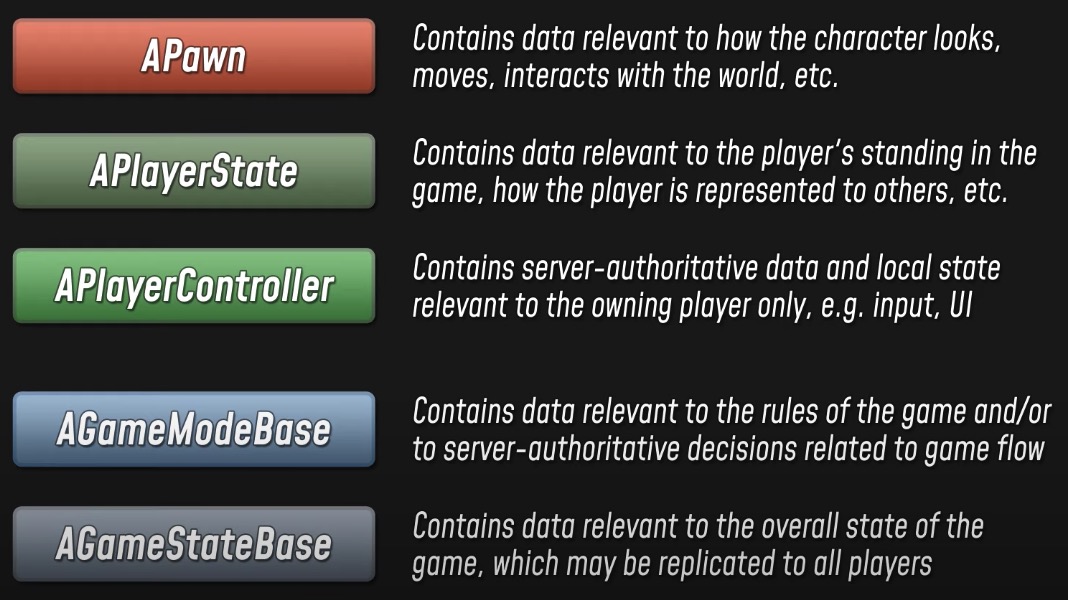
GameMode defines the rules of the game, and it spawns most of the core gameplay actors. It’s the ultimate authority for what happens during gameplay, and it only exists on the server.
GameSession and GameNetworkManager are server-only as well. The network manager is used to configure things like cheat detection and movement prediction. And for online games, the GameSession approves login requests, and it serves as an interface to the online service (like Stream or PSN, for example).
The GameState is created on the server, and only the server has the authority to change it, but it’s replicated to all clients. So it’s where you store data that’s relevant to the state of the game, that you want all players to be able to know about.
So now the world has been fully initialized, and we have the game framework actors that represent our game. All we’re missing now are the game framework actors that represent our player.

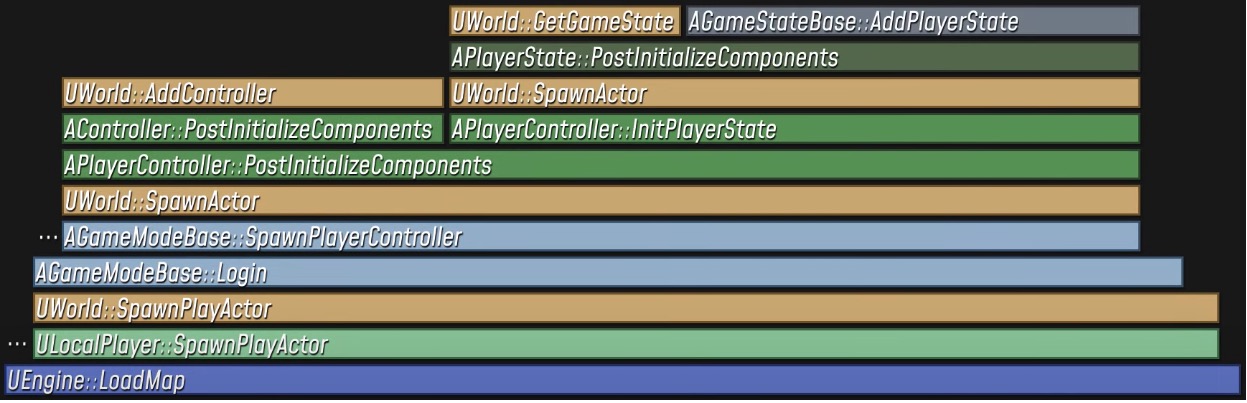
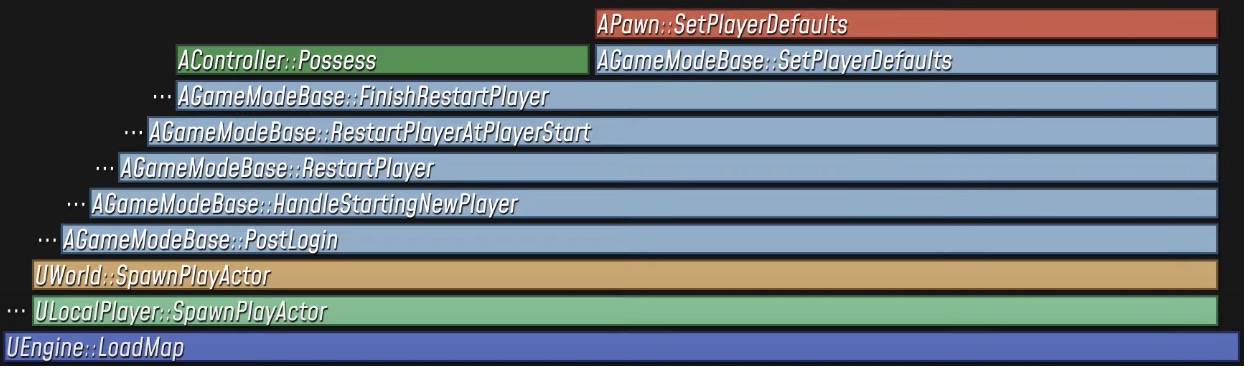
Here, LoadMap iterates over all the LocalPlayers present in our GameInstance, typically there’s just one. For that LocalPlayer, it calls the SpawnPlayActor function. Note that “PlayActor” is interchangeable with “PlayerController” here, this function spawns a PlayerController.
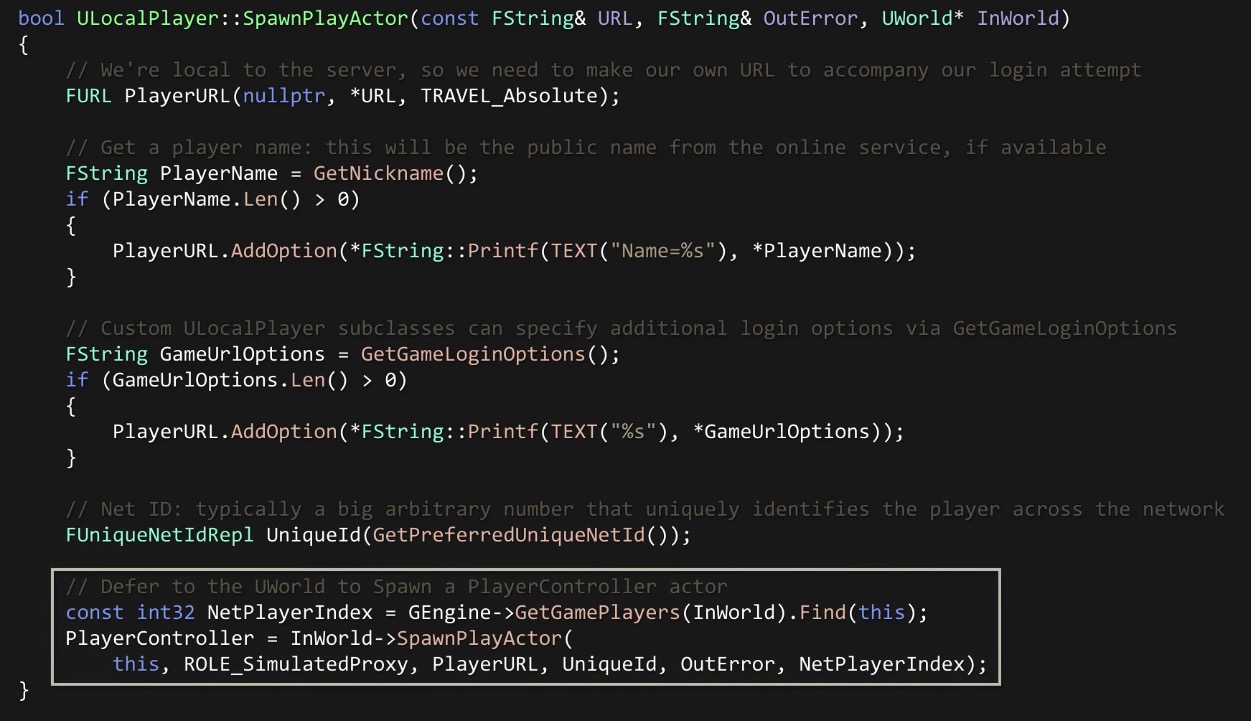
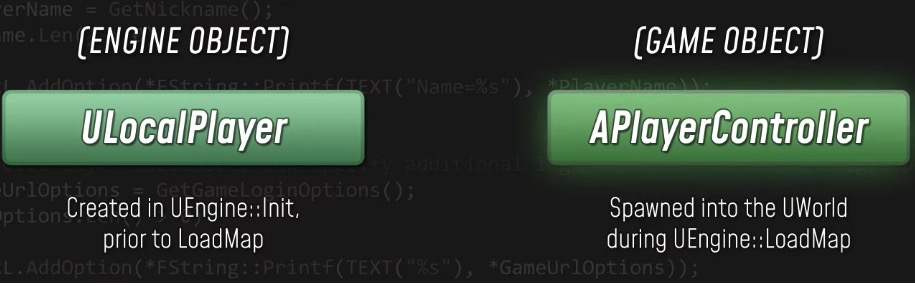
LocalPlayer, as we’ve seen, is the Engine’s representation of the player, whereas the PlayerController is the representation of the player within the game world.
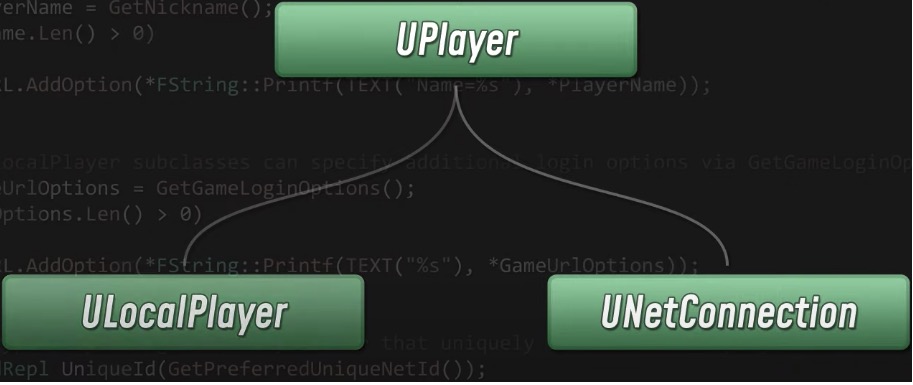
LocalPlayer is actually a specialization of the base Player class. There’s another Player class called NetConnection which represents a player that’s connected from a remote process. In order for any player to join the game, regardless of whether it’s local or remote, it has to go through a login process.
That process is handled by the GameMode.
The GameMode’s PreLogin function is only called for remote connection attempts. It’s responsible for approving or rejecting the login request.
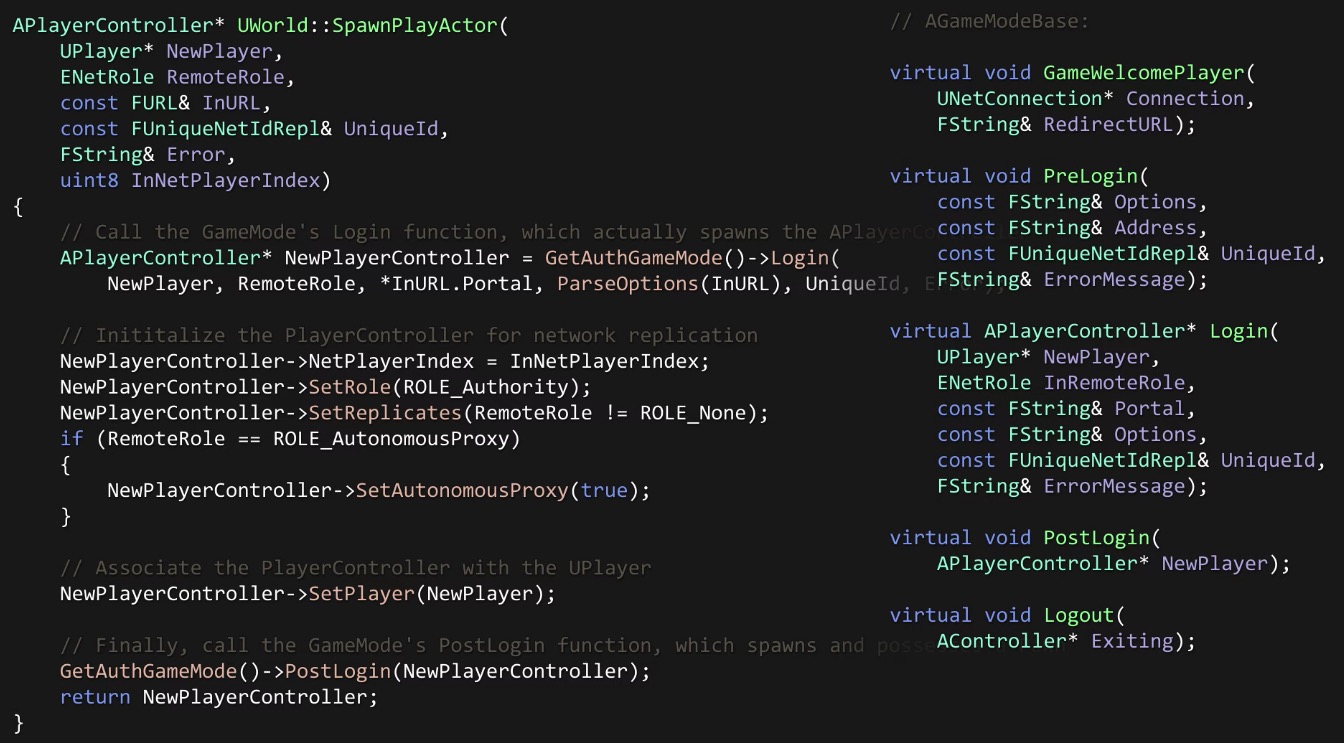
Once we have the go-ahead to add the player into the game, either because the remote connection request was approved or because the player is local, Login gets called.

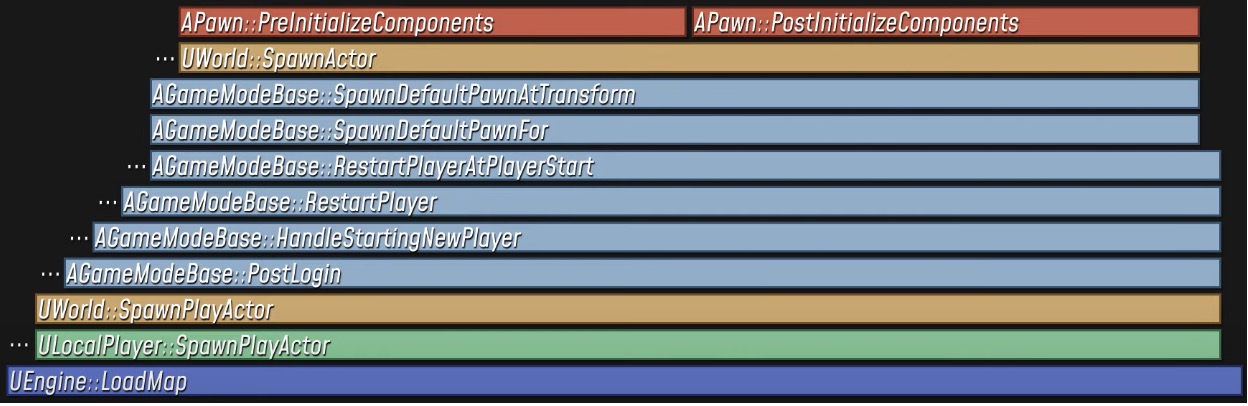
The Login function spawns a PlayerController actor and returns it to the World. Of course, since we’re spawning an actor after the world has been brought up for play, that actor gets initialized on spawn.
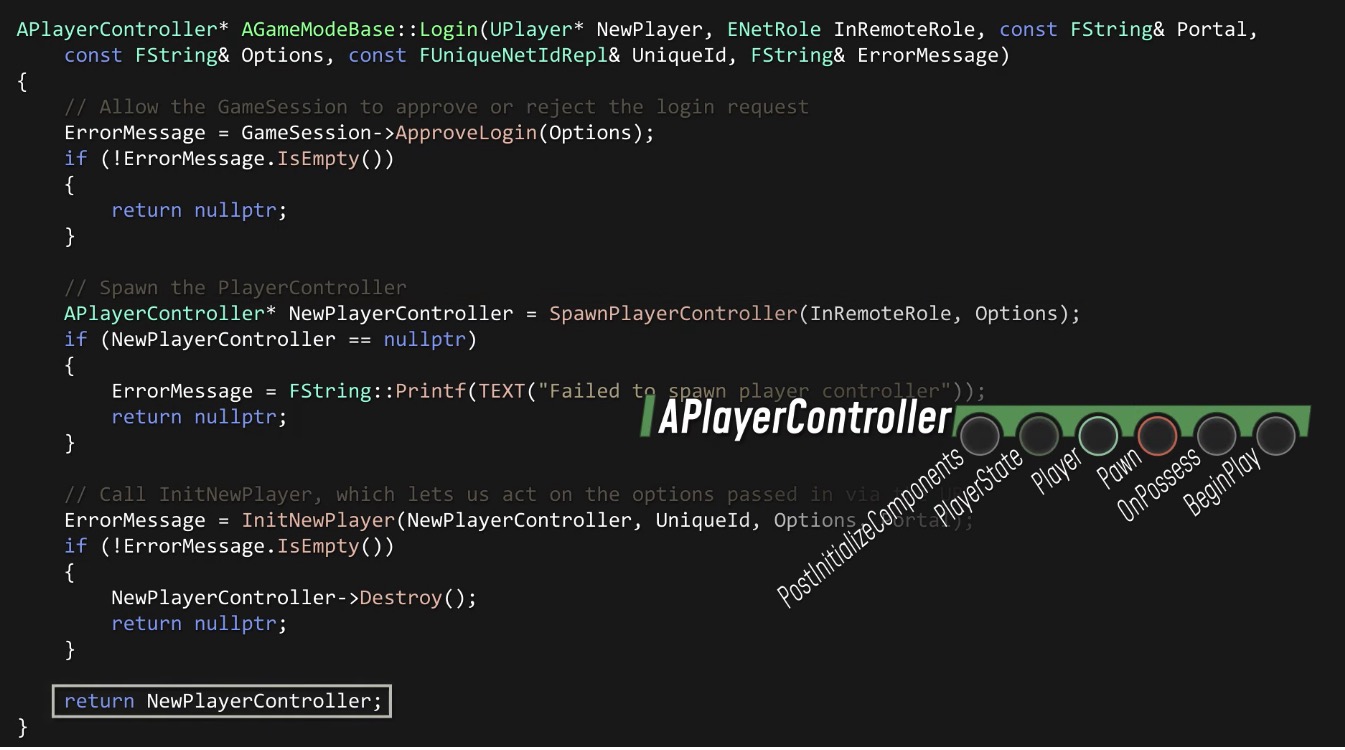
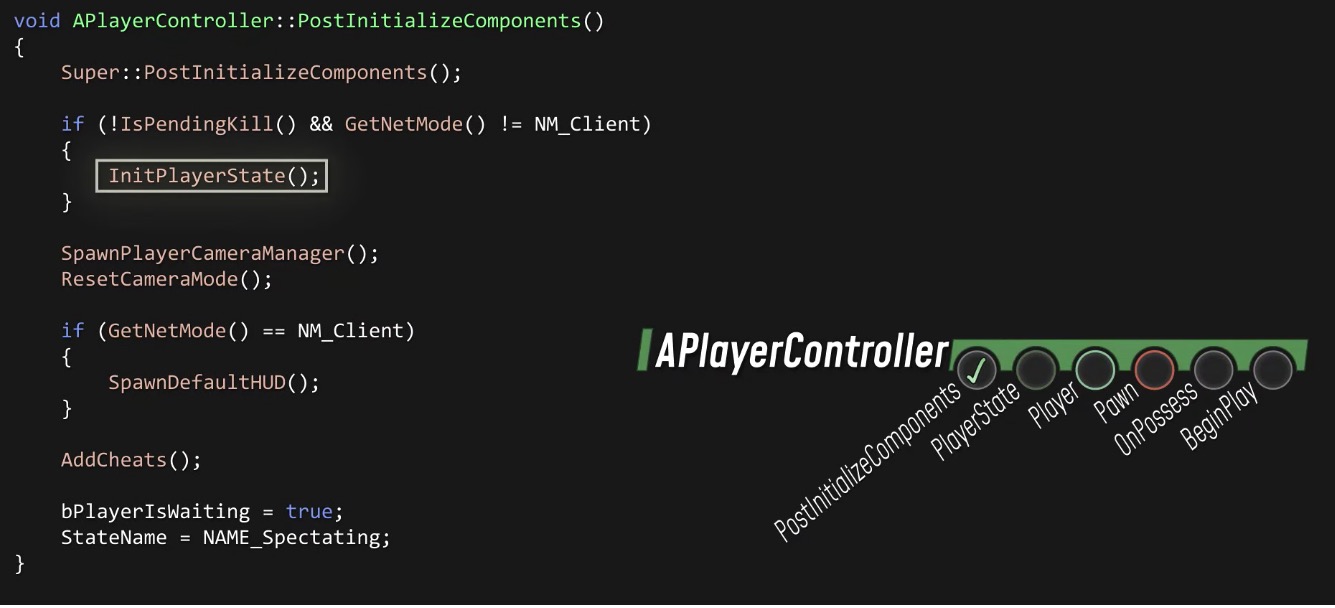
That means our PlayerController’s PostInitializeComponents function gets called, and it in turn spawns a PlayerState actor.
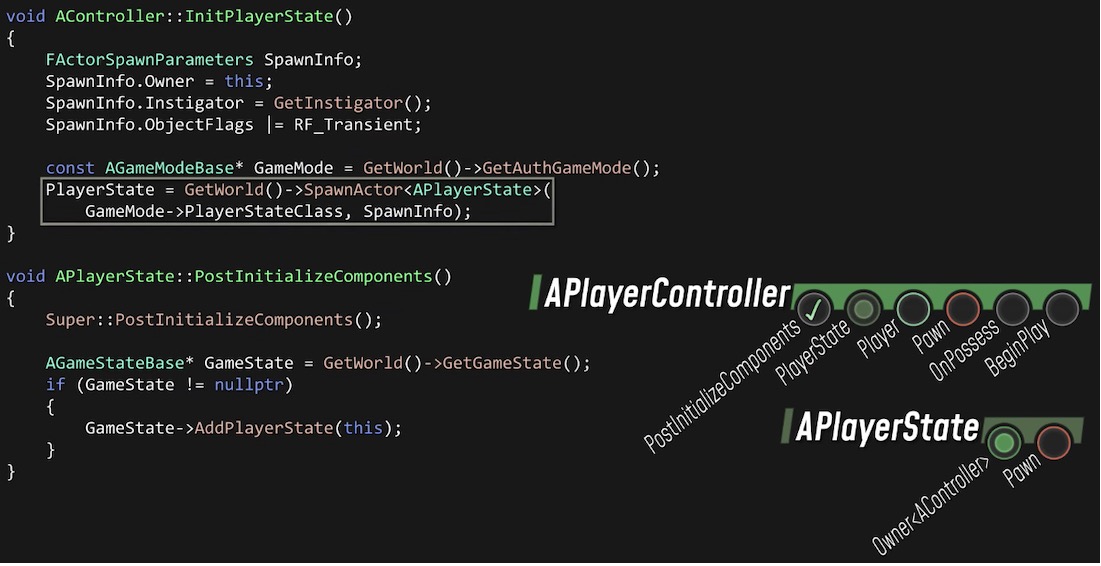
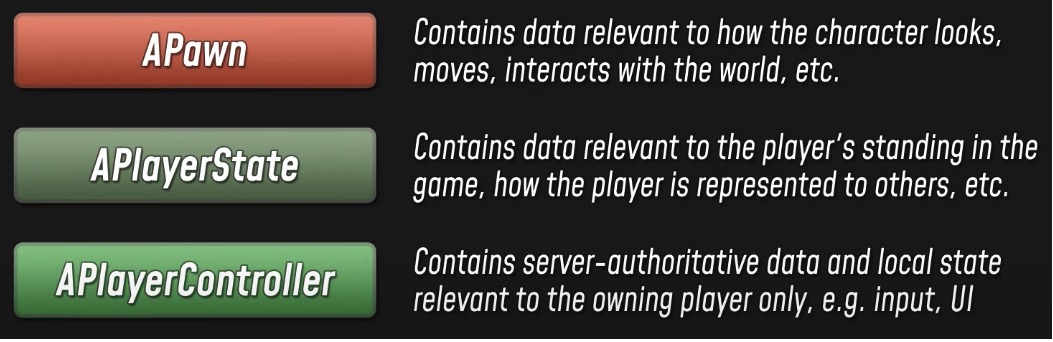
The PlayerController and PlayerState are similar to the GameMode and GameState in that one is the server-authoritative representation of the game (or the player), and the corresponding state object contains the data that everyone should know about the game (or the player).
Once the PlayerController has been spawned, the World fully initializes it for networking and associates it with the Player object.
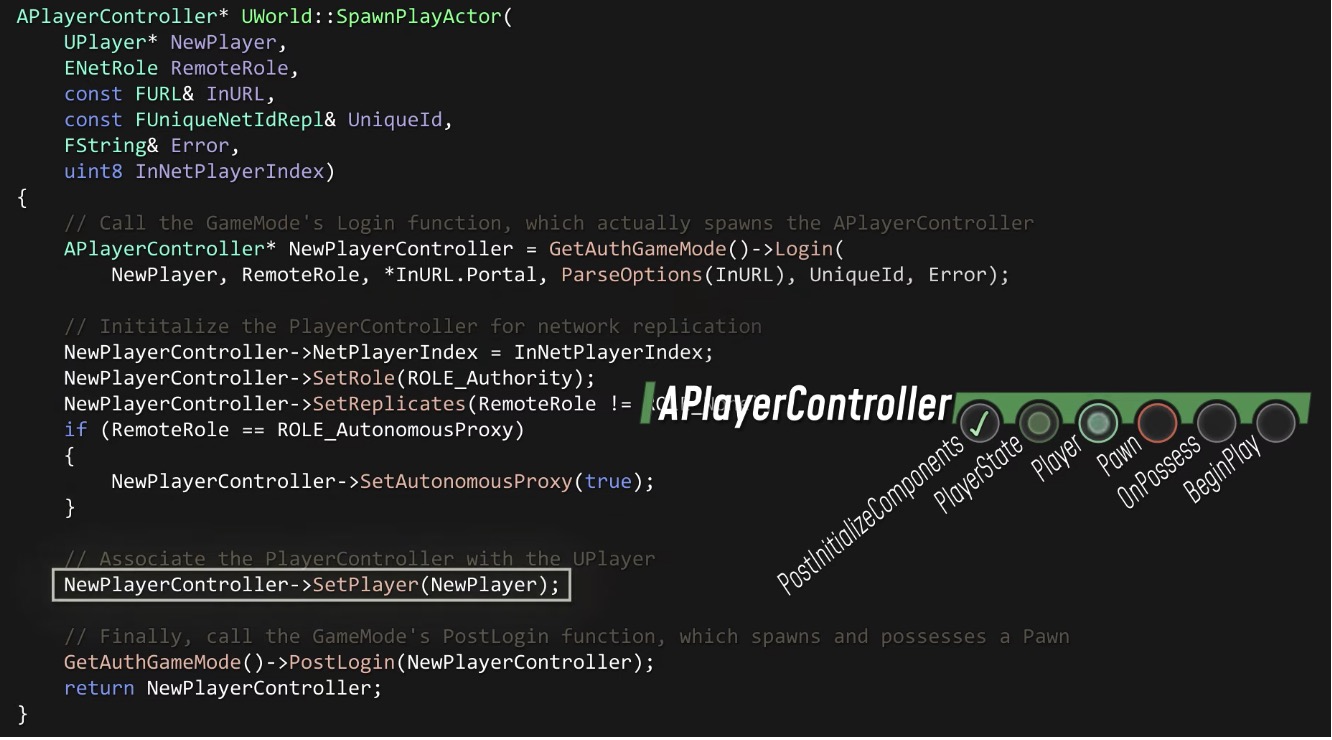
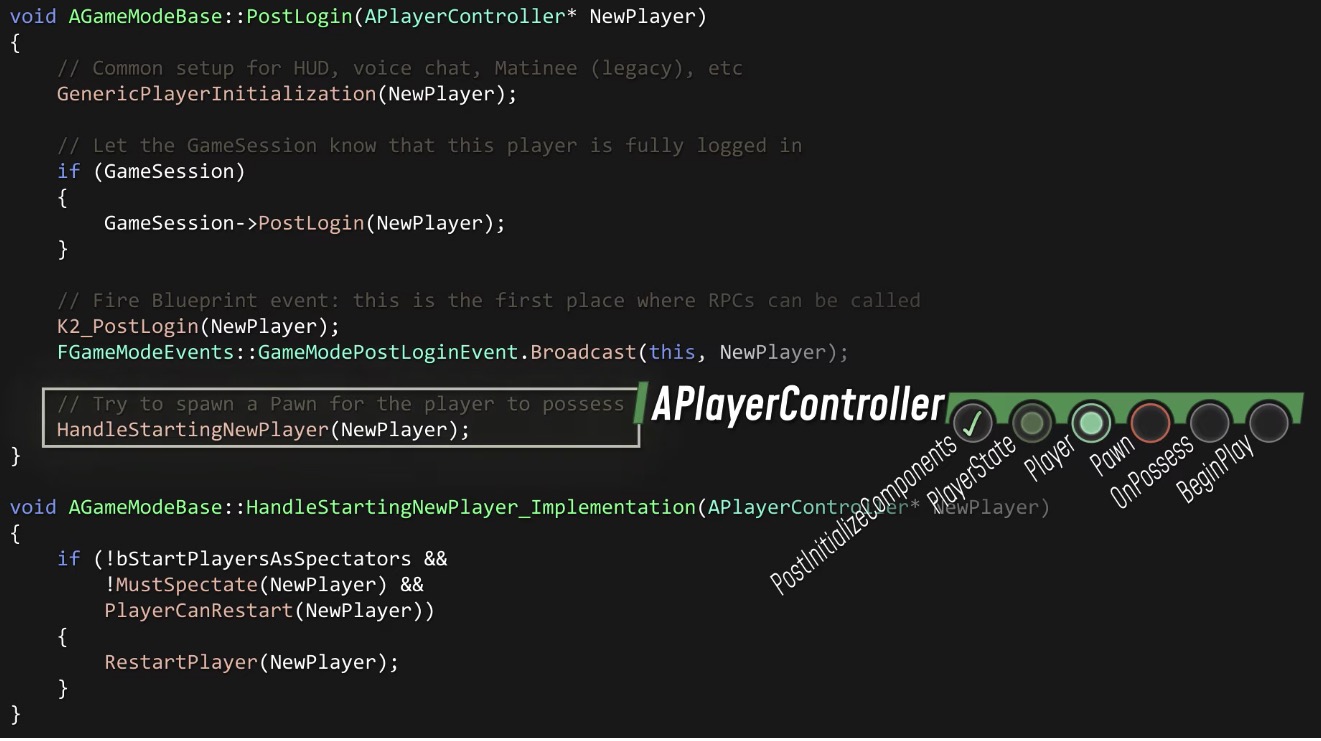
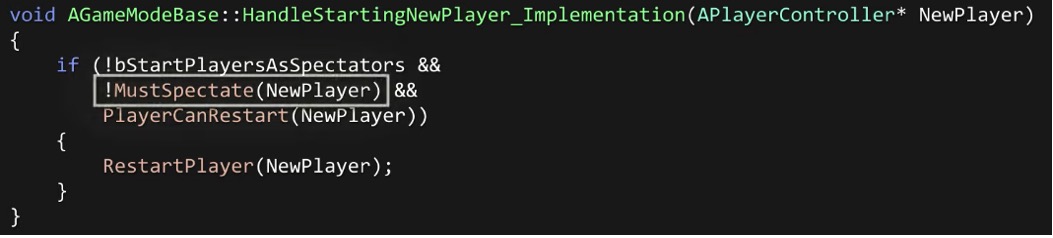
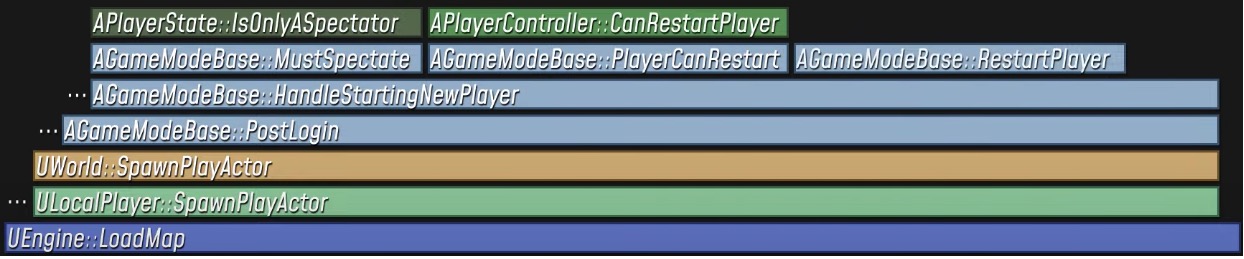
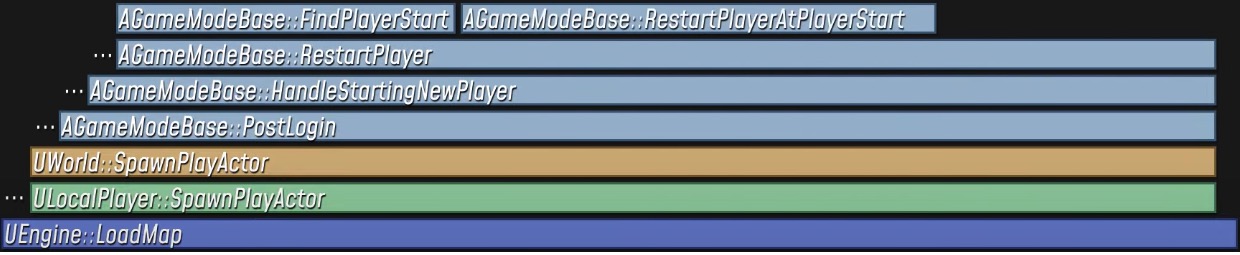
With all that done, the GameMode’s PostLogin function gets called, giving the game a chance to do any setup that needs to happen as a result of this player joining.
By default, the GameMode will attempt to spawn for the new PlayerController on PostLogin.
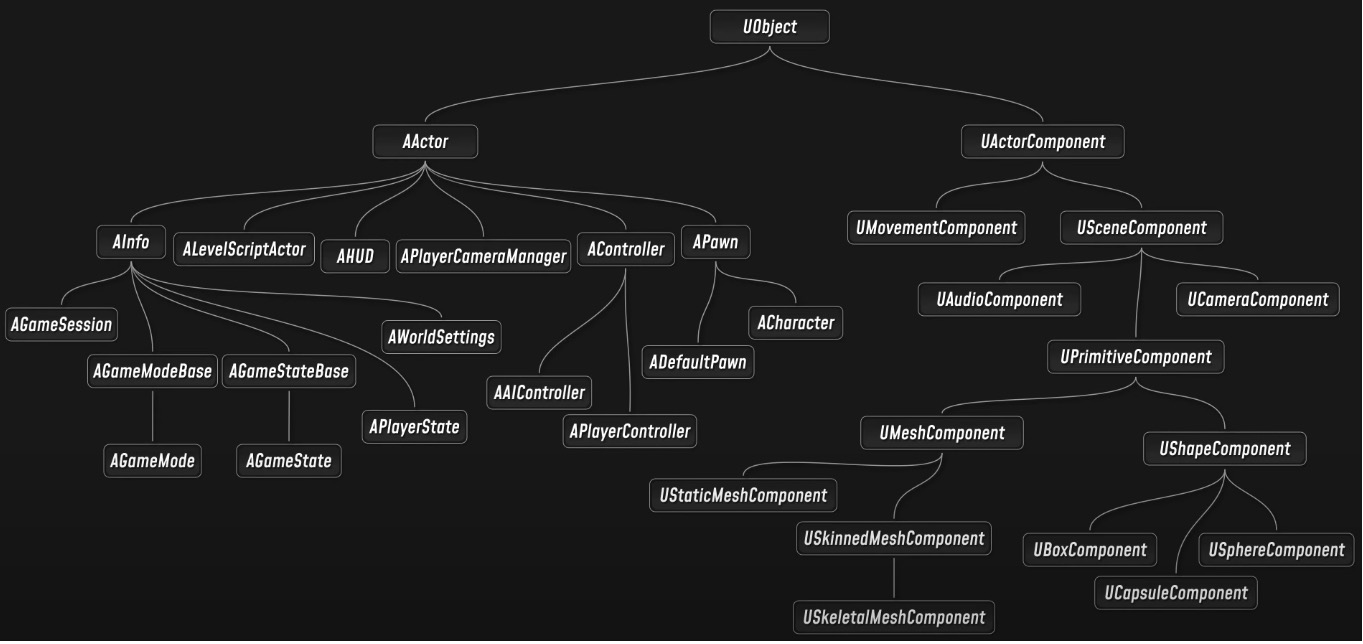
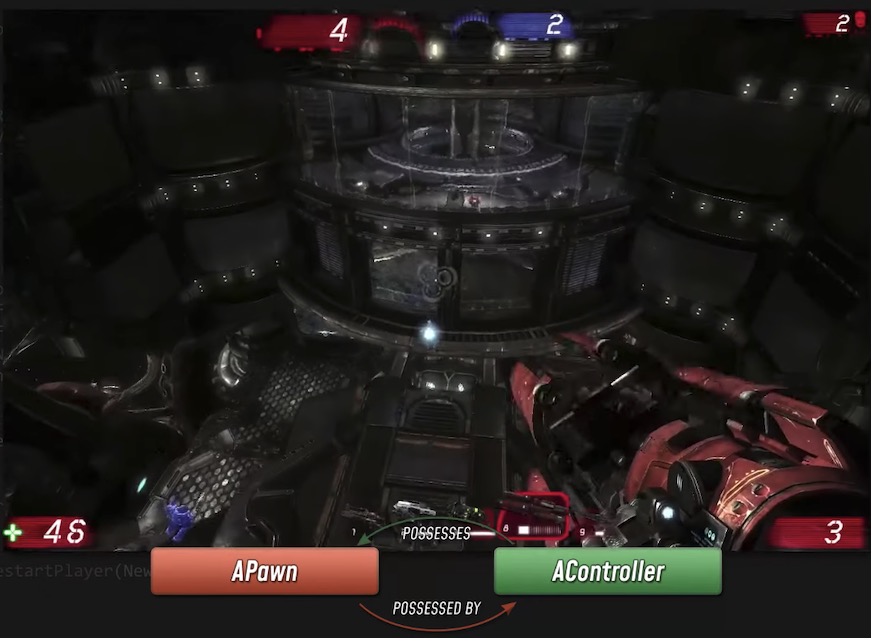
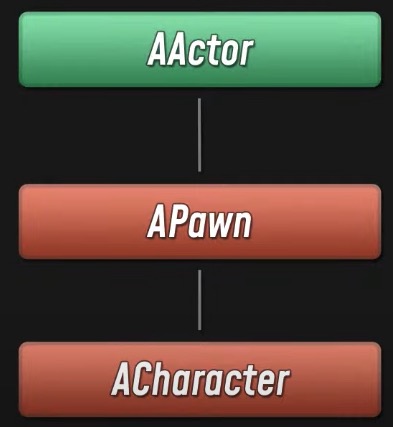
A Pawn is just a specialized type of actor that can be possessed by a Controller.
PlayerController is a specialization of the base Controller class, and there’s another subclass called AIController that’s used for non-player characters.
This is a longstanding convention in Unreal. If you have an actor that moves around the world based on its own autonomous decision-making process, whether that’s a human player making decisions and translating them into raw inputs, or an AI making higher-level decisions about where to go and what to do, then you typically have two actors.
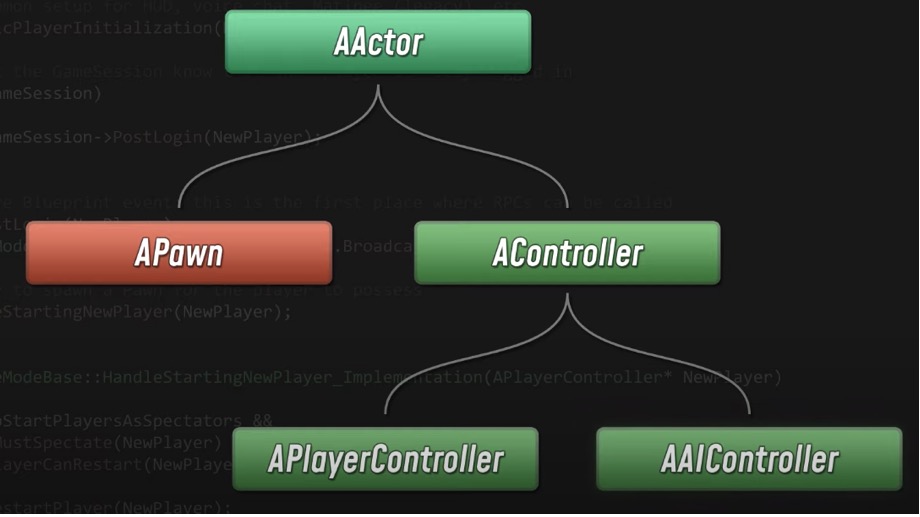
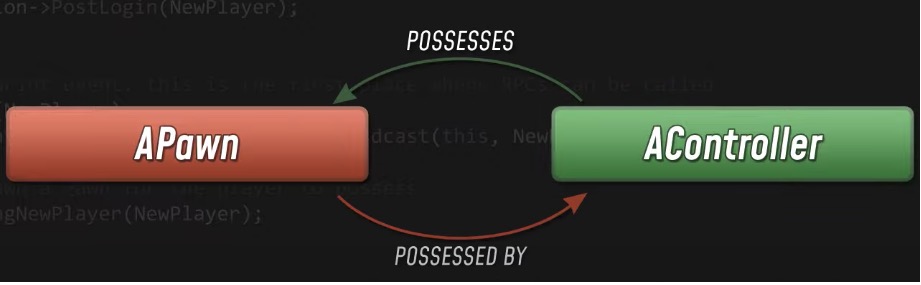
The Controller represents the intelligence driving the actor, and the Pawn is just the in-world representation of the actor.
So when a new player joins the game, the default GameMode implementation spawns a Pawn for the new PlayerController to possess. The game framework does also support spectators, your PlayerState can be configured to indicate that the player should spectate, or you can configure the GameMode to start all players as spectators initially. In that case, the GameMode won’t spawn a Pawn, and instead, the PlayerController will spawn its own SpectatorPawn that allows it to fly around without interacting with the game world. Otherwise, on PostLogin the game mode will do what it calls “restarting the player”.
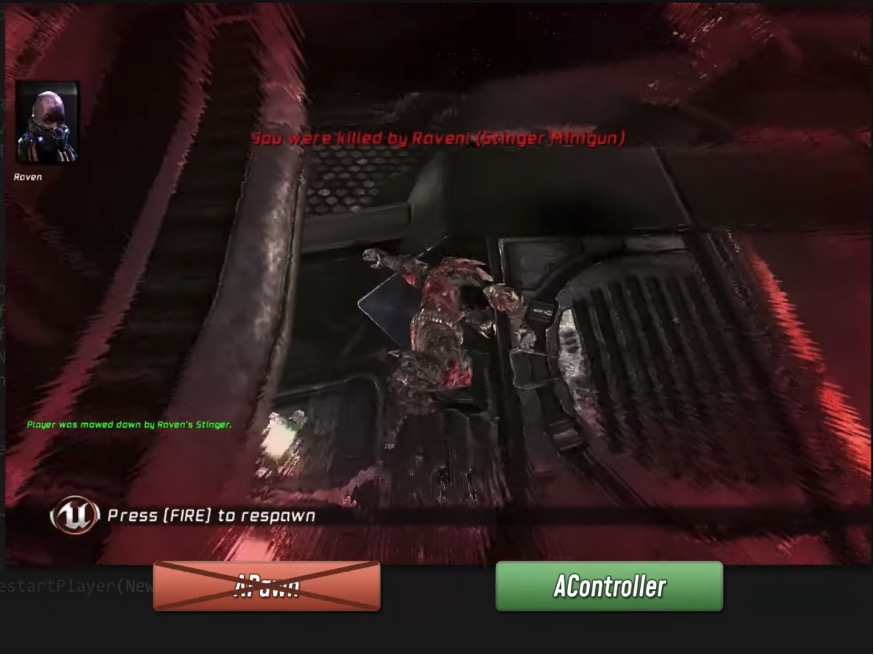
Think of “restarting” in the context of a multiplayer shooter, if a player gets killed, its Pawn is dead, it’s no longer being controlled, it just hangs around as a corpse until it’s destroyed. But the player controller is still around, and when the player’s ready to respawn, the GameMode needs to spawn a new Pawn for them.
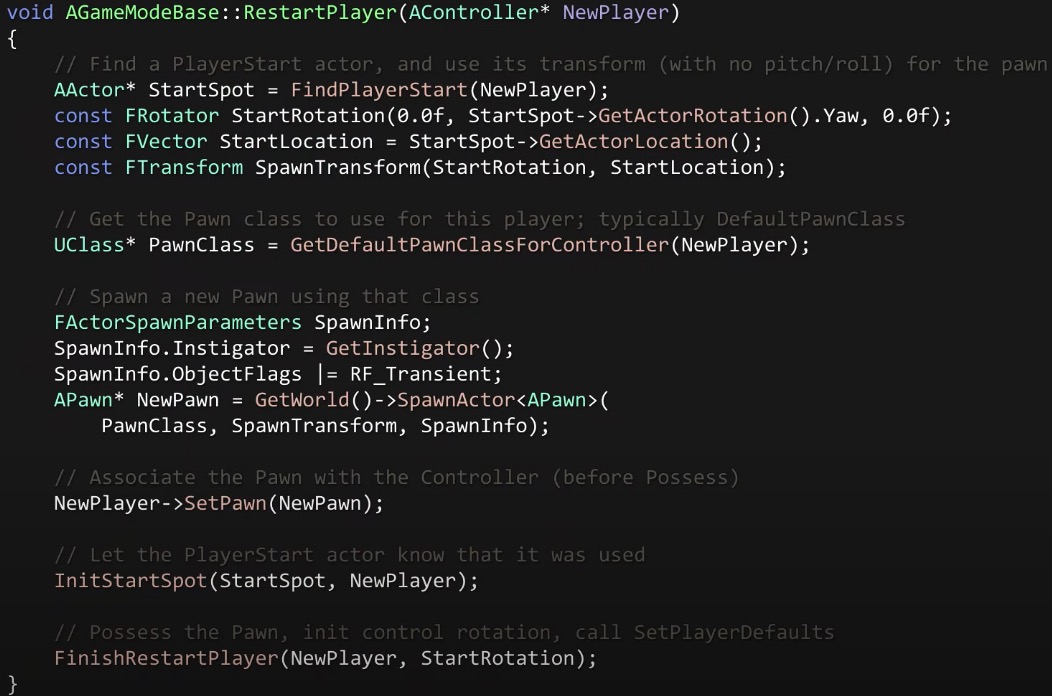
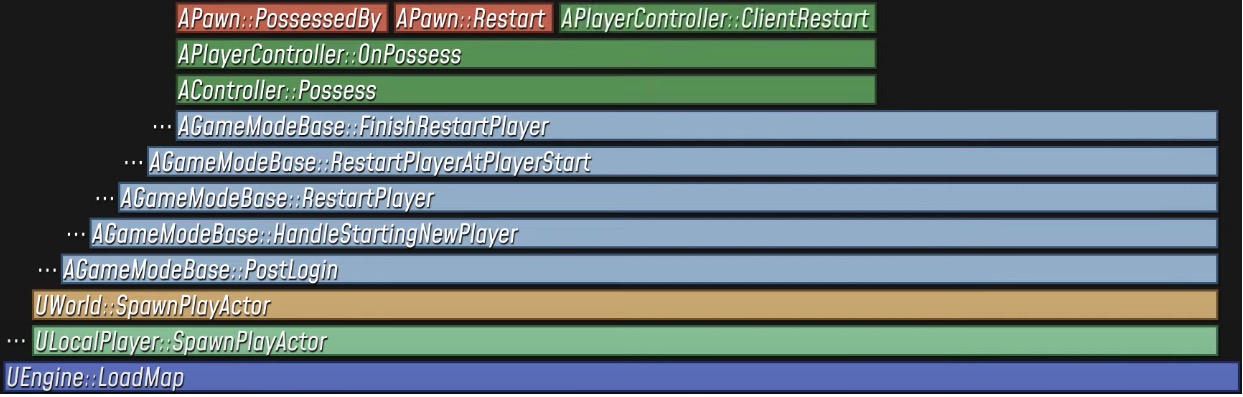
So that’s what RestartPayer does: given a PlayerController, it’ll find an actor representing where the new Pawn should be spawned, and then it’ll figure out which Pawn class to use, and it’ll spawn an instance of that class. By default, the game mode looks through all the PlayerStart actors that have been placed in the map and picks one of them. But all of this behavior can be overridden and customized in your own GameMode class. In any event, once a Pawn has been spawned, it’ll be associated with the PlayerController, and the PlayerController will possess it.
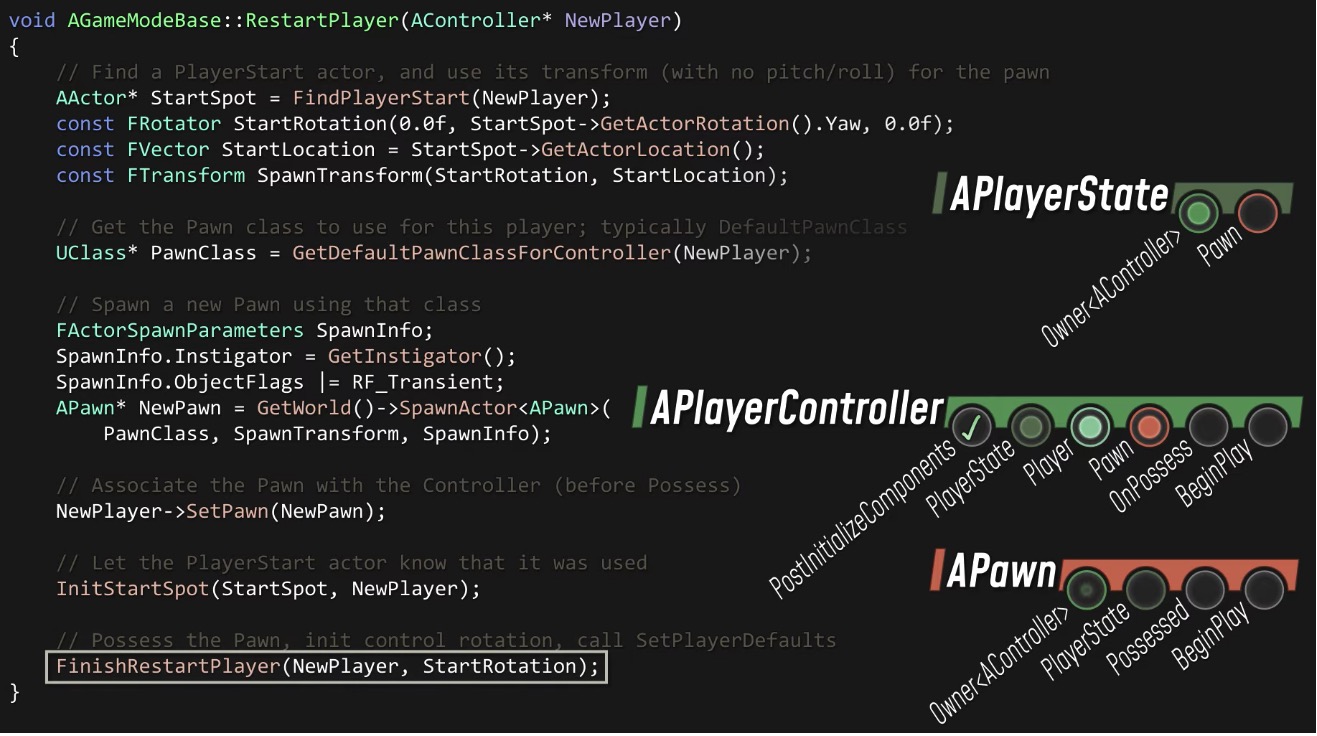
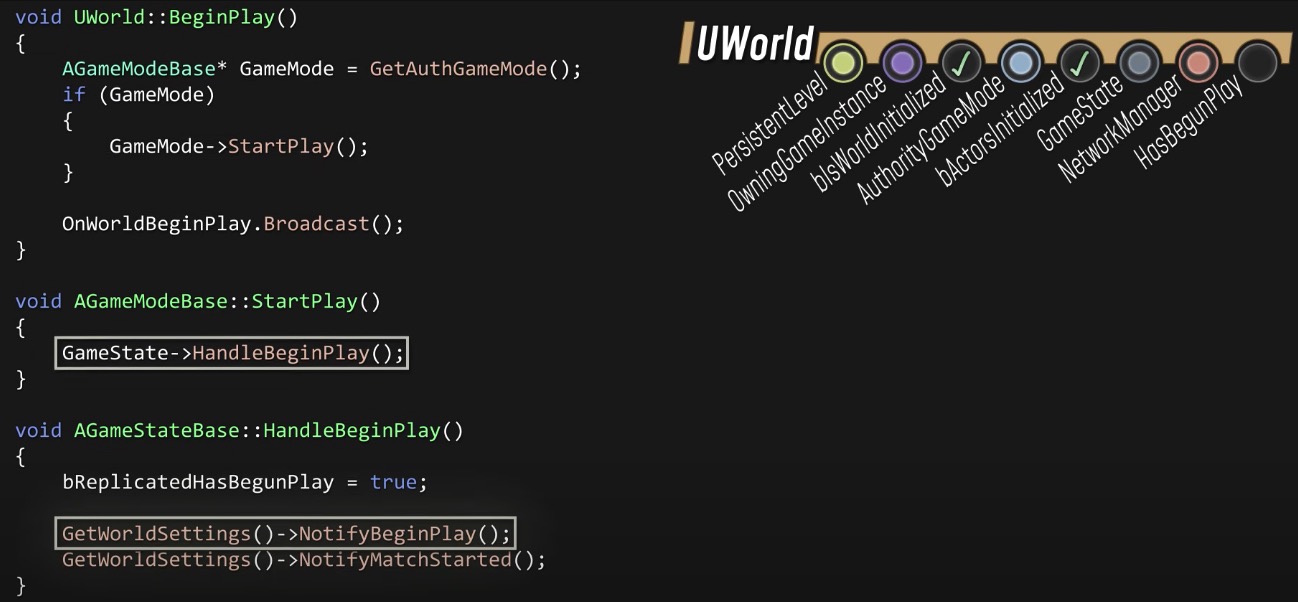
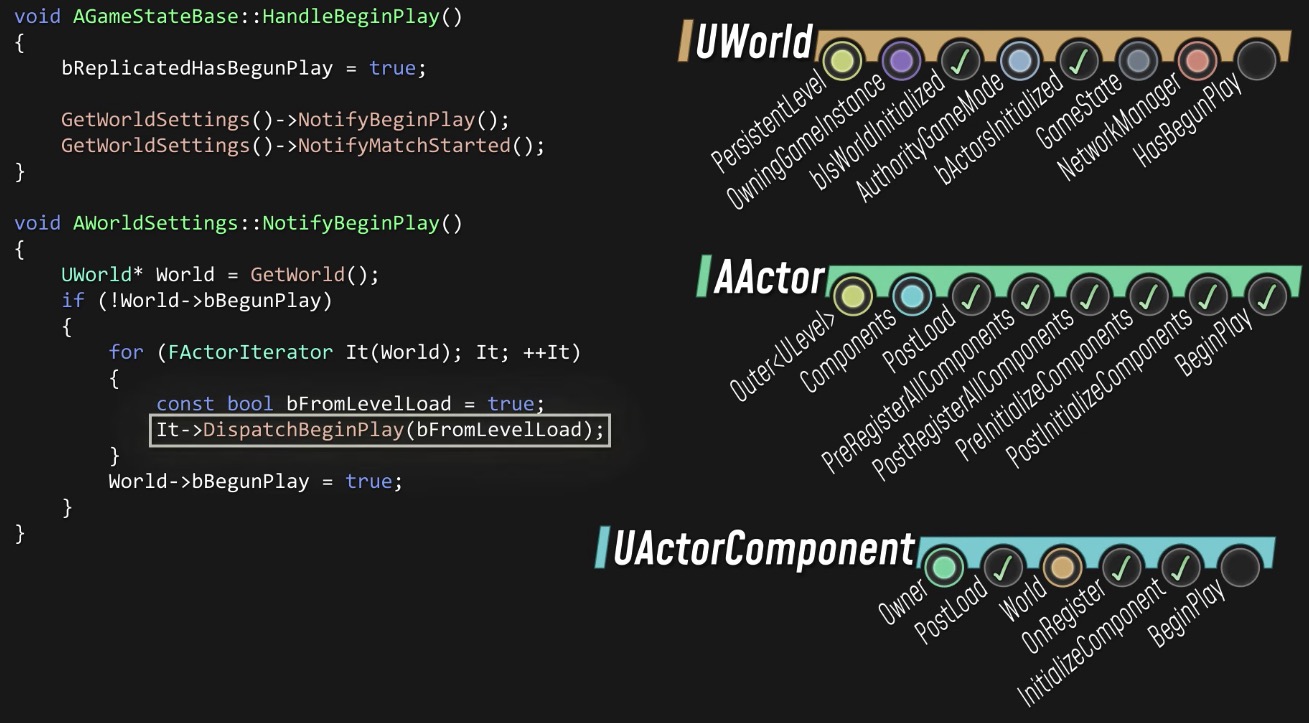
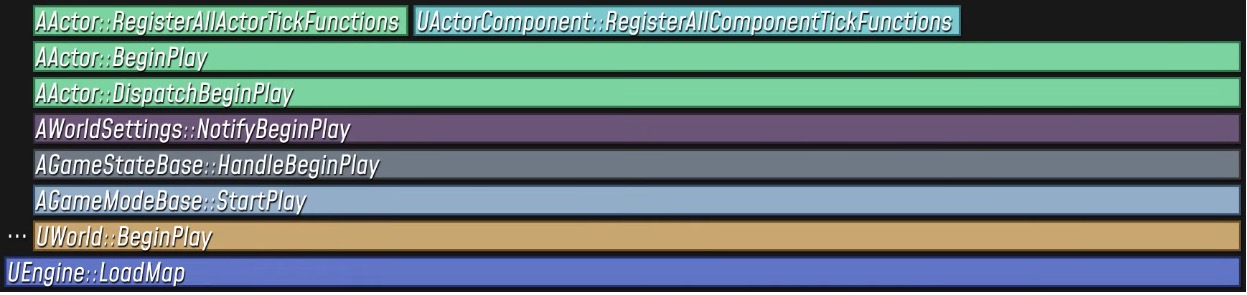
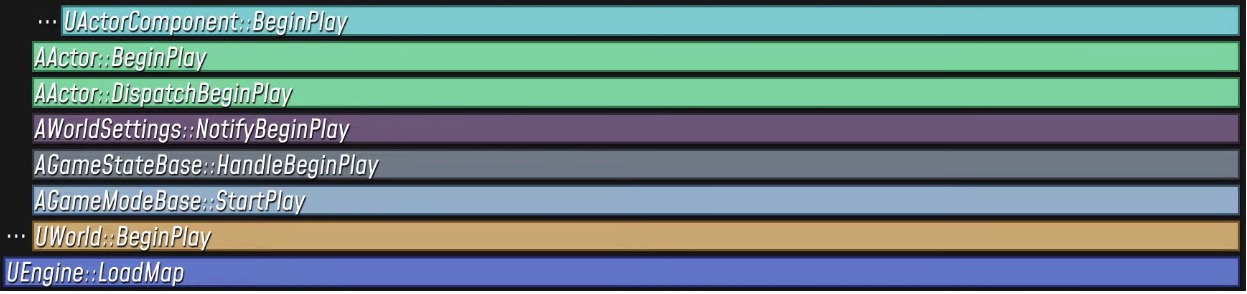
Now, back in LoadMap, we’ve got everything ready for the game to actually start. All that’s left to do is route the BeginPlay event. The Engine tells the World, the World tells the GameMode, the GameMode tells the WorldSettings, and the WorldSettings loops over all actors. Every actor has its BeginPlay function called, which in turn calls BeginPlay on all components, and the corresponding BeginPlay events are fired in Blueprints.

With all that done, the game is fully up and running, LoadMap can finish up, and we’ve made it into our game loop.
Let’s run through that one more time, quickly, just to review.
When we run our game in its final packaged form, we’re running a process.

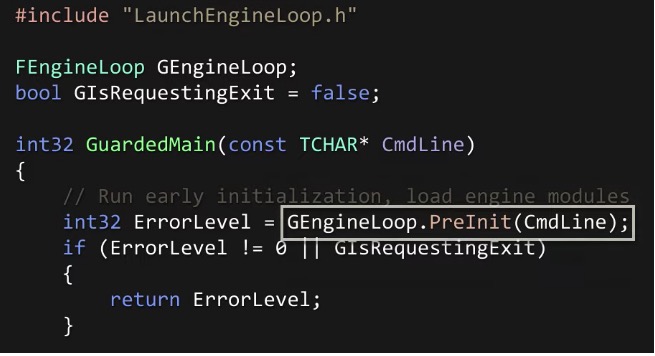
The entry point of that process is a main function.
The main function runs the engine loop.
The engine loop handles the initialization, then it ticks every frame, and when it’s done, it shuts everything down.

Right now, we are mostly concerned with what happened during initialization.
The first point where your project or plugin code runs is going to be when your module is loaded.

That can happen at a number of points depending on the LoadingPhase, but typically it happens toward the end of PreInit.

When your module is loaded, any UObject classes get registered, and default objects get initialized via the constructor. Then your module’s StartupModule function is called, and this is the first place where you might hook into delegates to set up other functions to be called later.

The Init stage is where we start setting up the Engine itself. In short, we create an Engine object, we initialize it, and then we Start the game.

To initialize the Engine, we create a GameInstance and a GameViewportClient, and then we create a LocalPlayer and associate it with the GameInstance.

With those essential objects in place, we can start loading up the game. We figure out which map to use, we browse to that map, and let the GameInstance know when that’s finished.

The rest of our startup process happens in the LoadMap call.
First we find our map package, then we load it. This brings any actors placed into the persistent level into memory, and it also gives us a World and a Level object.

We find that World, we give it a reference to the GameInstance, we initialize some systems in the World, and then we spawn a GameMode actor.


After that, we fully load the map, bringing in any always-loaded sublevels and any assets that need to be loaded.

With everything fully loaded, we start bringing the world up for play.
We first register all components for every actor in every level.
And then we initialize the GameMode, which in turn spawns a GameSession actor.

Then we initialize all the Actors in the world. First, we call PreInitializeComponents on every actor in every level.

When this happens for the GameMode, it spawns a GameState, and a GameNetworkManager, and then it initializes the GameState.

Then in another loop, we initialize every actor in every level, this calls InitializeComponent (and potentially Activate) for all components that need it, and then our actors become fully-formed.

Once the world is brought up for play, we can log our LocalPlayer into the game.
Here we spawn a PlayerController which in turn spawns a PlayerState for itself and adds that PlayerState to the GameState.
And then we register that player with the GameSession and cache an initial start spot.

With the PlayerController spawned, we can now initialize it for networking, and associate it with our LocalPlayer.

And then we proceed to PostLogin, where assuming everything is set up for it, we can restart the player, meaning we figure out where they should start in the world.
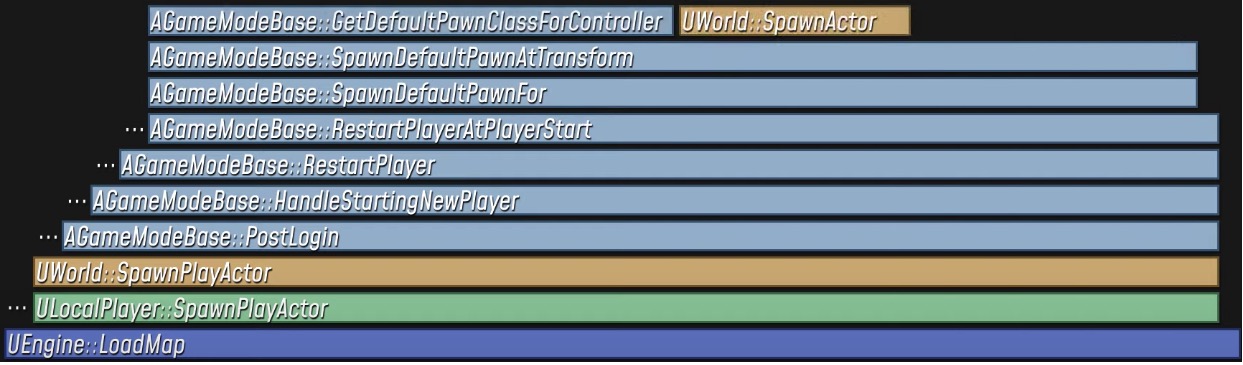
We figure out which Pawn class to use, and then we Spawn and initialize a Pawn.
And then we have the PlayerController possess the Pawn, and we have a chance to set up defaults for a player-controlled pawn.
Finally, all we have to do is route the BeginPlay event. This results in BeginPlay being called on all Actors in the World, which registers tick functions and calls BeginPlay on all components.
And then finally, that’s where our BeginPlay blueprint event gets fired.
At that point, we’re done loading the map, we’ve officially started the game, and we’ve finished the initialization stage of our engine loop.
A few quick points to wrap up:
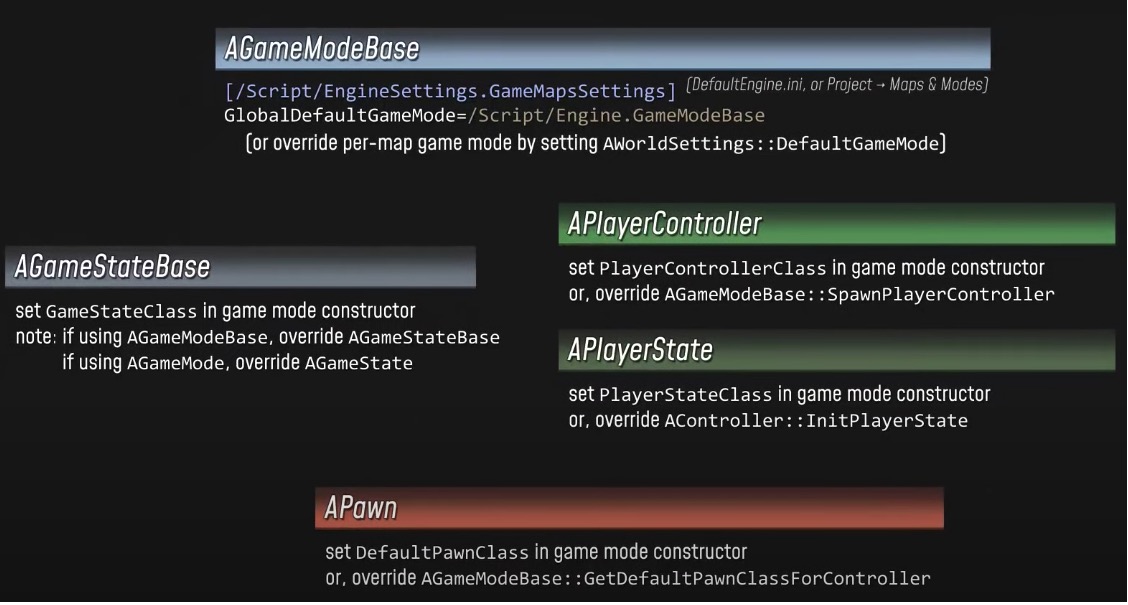
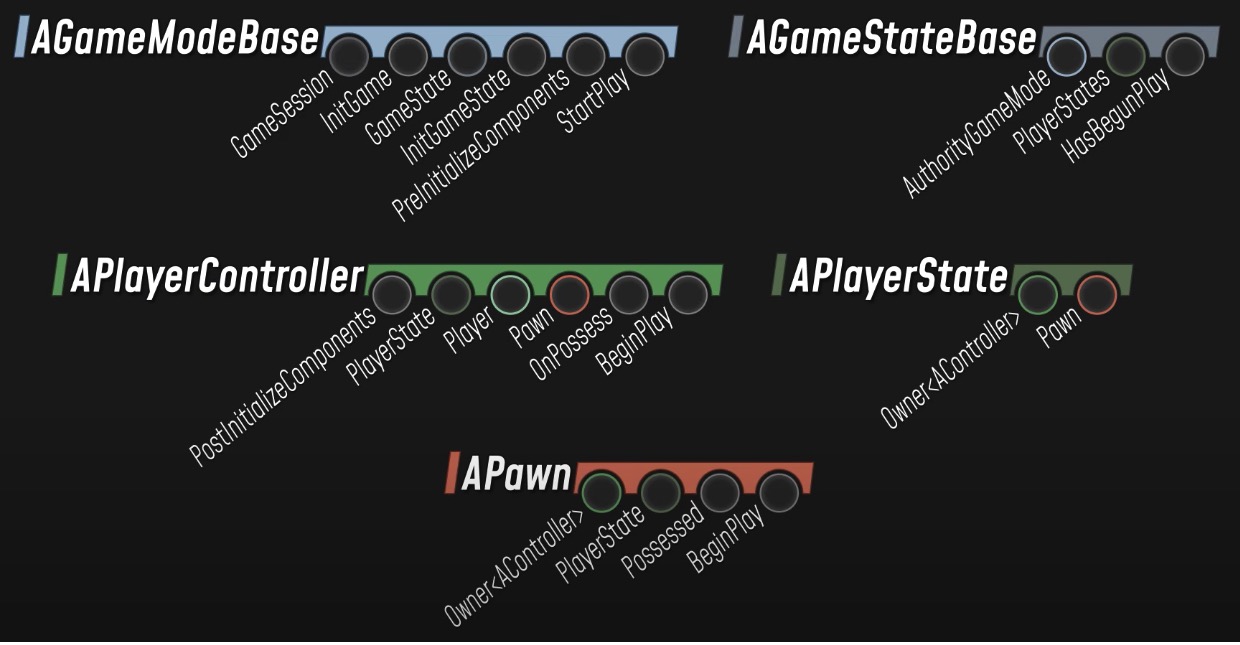
We looked at the GameModeBase and GameStateBase classes rather than GameMode and GameState. These base classes were added in Unreal 4.14, in order to factor out some of the Unreal-Tournament-flavored functionality from the game mode.
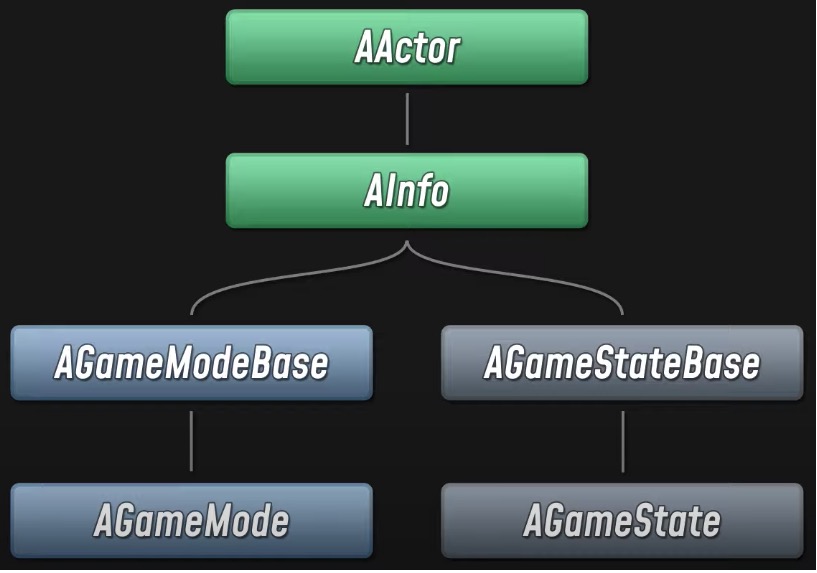
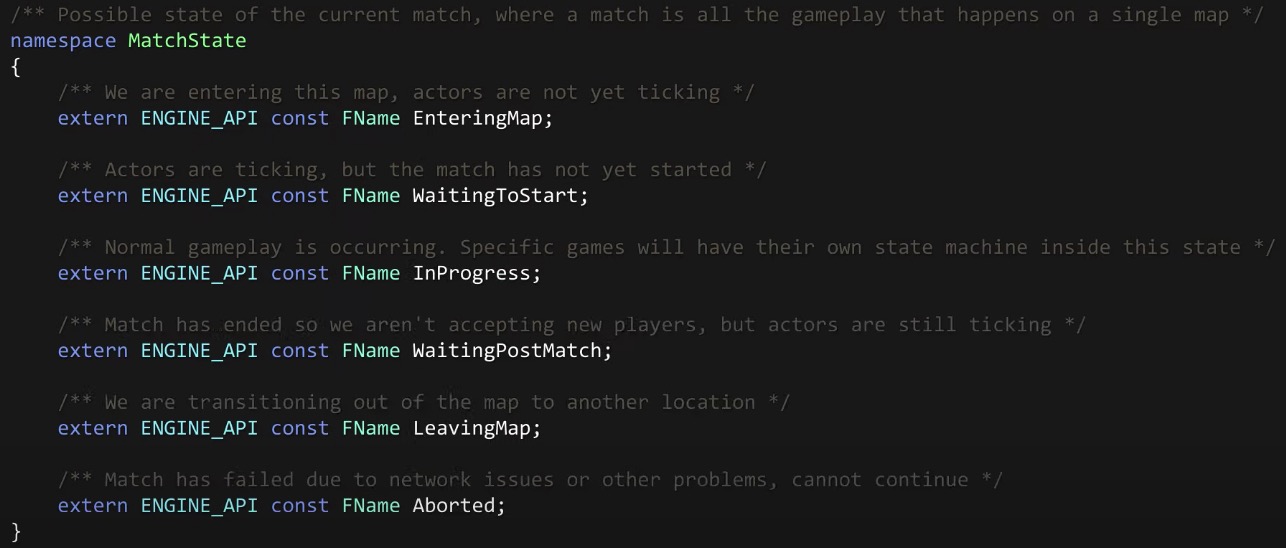
Whereas GameModeBase contains all the essential game mode functionality, the GameMode class adds the concept of a “match”, with match state changes that occur after BeginPlay. This handles overall game flow, like spectating before all players are ready, deciding when the game starts and ends, and transitioning to a new map for the next match.
We also looked at the Pawn class, but the GameFramework also defines a Character class, which is a specialized type of Pawn that includes several useful features.
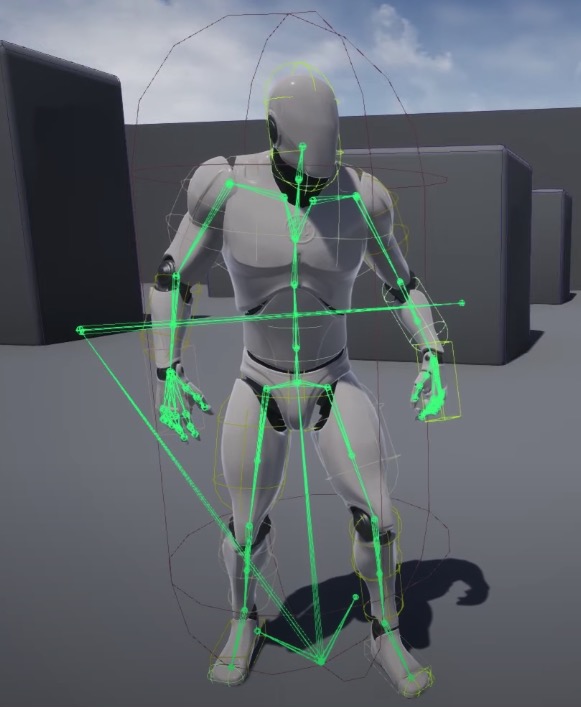
A Character has a collision capsule that’s used primarily for movement sweeps.

It has a skeletal mesh, so it’s assumed to be an animated character.
It has a CharacterMovementComponent, which is kind of tightly coupled to the Character class and does a few very useful things.
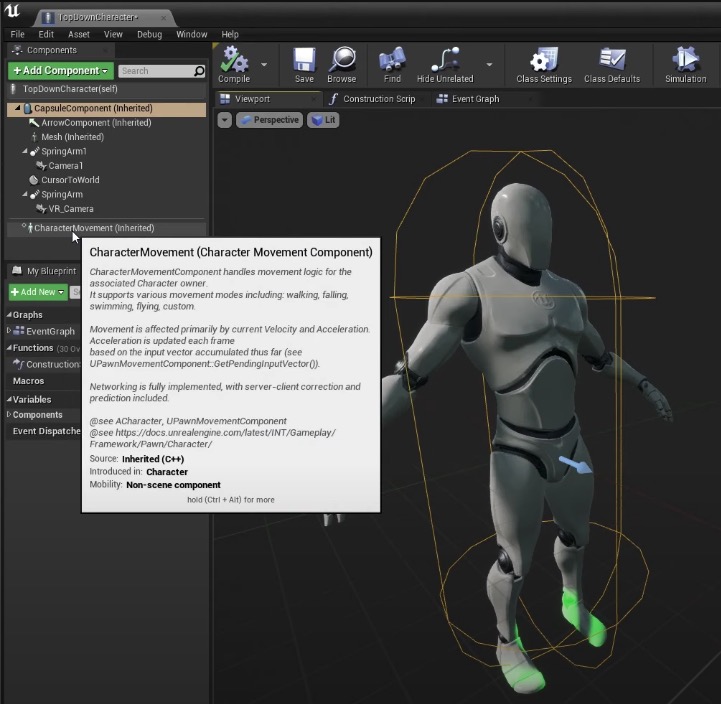
The most important thing is that the Character movement is replicated out of the box, with client-side movement prediction. That’s a very useful feature to have if you’re making a multiplayer game. Characters can also consume root motion from animation playback and apply it to the actor, with replication. Character Movement also handles navigation and pathfinding, so you can have an AIController possess a Character and it’ll be able to move anywhere on the navmesh that you tell it to, without you having to run your own navigation queries.
And finally character movement implements a full kitchen-sink range of movement options for walking, jumping, falling, swimming and flying, and there are lots of different parameters for tuning movement behavior. You can take advantage of most of that functionality at a lower level, at least in C++, but the Character class is a great starting point. Just keep in mind that if you leave the default Character settings untouched, then your game is just going to feel like an Unreal tutorial project through no fault of its own. So it’s a good idea to think about how you want your game’s movement to feel, in the abstract, and then tune the movement parameters accordingly.
So, all of these classes that we’ve looked at (with the exception of UWorld and ULevel) are here for you to extend as needed.
We’ve seen how Unreal has this mature GameFramework that has established design for handling things like online integration, login requests, and network replication. That means that you can develop multiplayer games pretty easily out of the box, and the design of the engine allows you to add custom functionality at pretty much any level. If you are mostly interested in making simple, purely single-player games, then the complexity of the GameFramework might feel kind of pointless to you. Just bear in mind that it’s purely opt-in, for example, if you don’t need to do anything special before the map is loaded, then you probably don’t need a custom GameInstance class, and the default GameInstance implementation will just do its job and stay out of your way.
I still think it’s useful to know what these classes are designed for, though, because once you know what you’re doing, it doesn’t cost you anything to use them as intended, and you generally end up with a cleaner design that way.
For example, if you have some information about a player that you need to keep track of, there are a number of different places you could put that data.
For a multiplayer game, you need to choose wisely, or you might find that the data isn’t accessible where you need it to be. If you’re making a singleplayer game, you could pick pretty much any object, including the GameMode, and the worst that happens is that you have to follow an awkward chain of references to get to the data when you need it.
But regardless of what kind of game you’re making, it’s a good idea to think critically about how your data is structured, and how different objects interact with each other. It’ll make you a better programmer in a long run.
It’s also worth pointing out that extending these classes through inheritance isn’t the only way to add your own functionality to the engine.

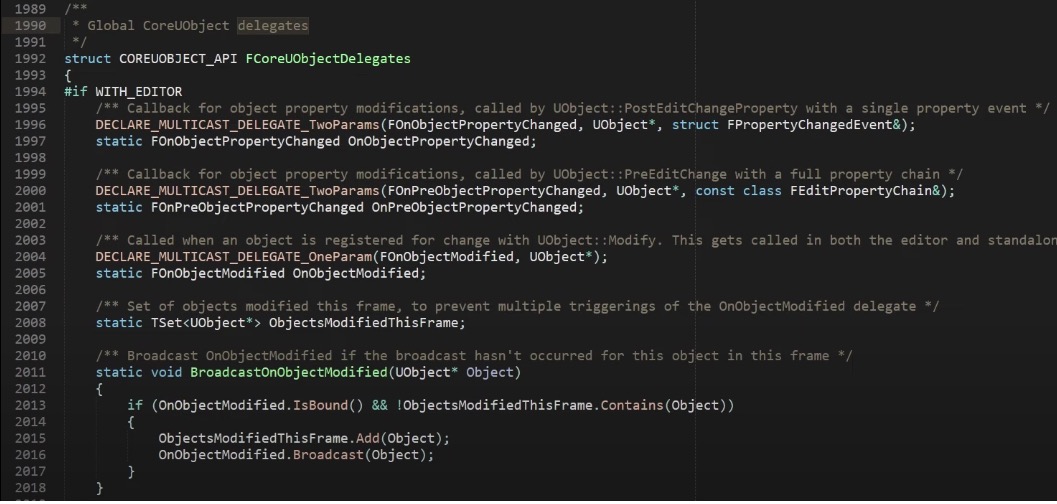
If you just need to run some code in response to something that the Engine does, the simplest approach is just to bind a callback function to a delegate that represents that event. In particular, the Engine defines a few different sets of static delegates that you can bind at any point. That includes CoreDelegates, CoreUObjectDelegates, GameViewportDelegates, GameDelegates, and WorldDelegates.
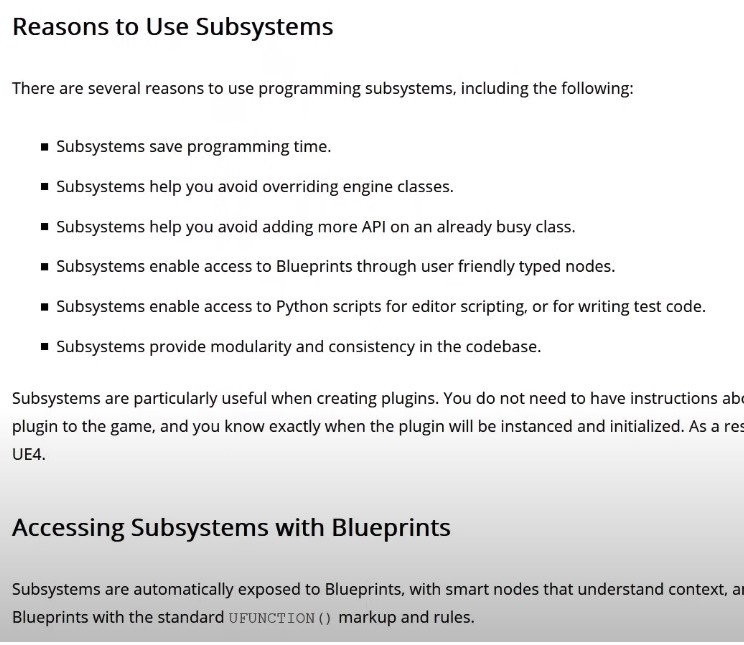
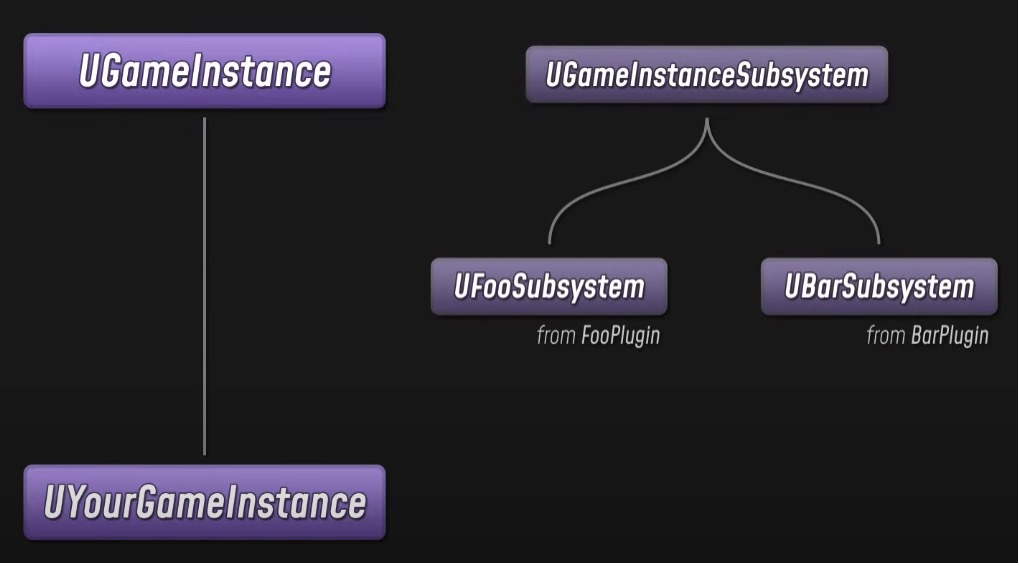
As of Unreal 4.22, the Engine also has a “subsystem” feature that makes it easy to add modular functionality. All you have to do is define a class that extends one of these subsystem types, and the Engine will automatically create an instance of your subsystem that’s tied to the lifetime of the corresponding object.
For example, a plugin might add custom functionality to your project by having you use a custom GameInstance that’s defined in that plugin. That would work, but you’d be locked into that class, if there was a second plugin that did the same thing, you’d be out of luck.
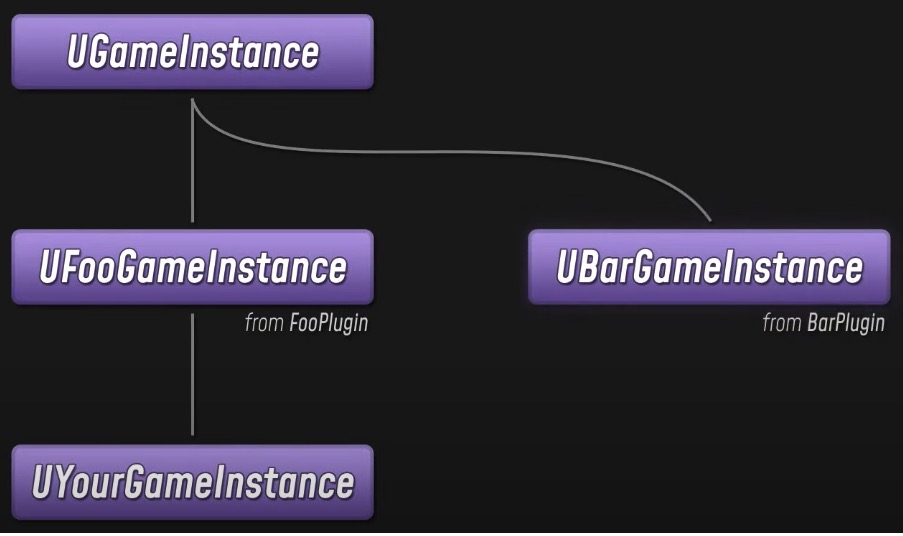
Using a GameInstanceSubsystem instead of a custom GameInstance would solve that problem, and that’s generally a cleaner approach for modular, self-contained functionality.
So let’s look at how Unreal starts up your game.
Content Source: The Unreal Engine Game Framework: From int main() to BeginPlay