Aliasing
 |  |
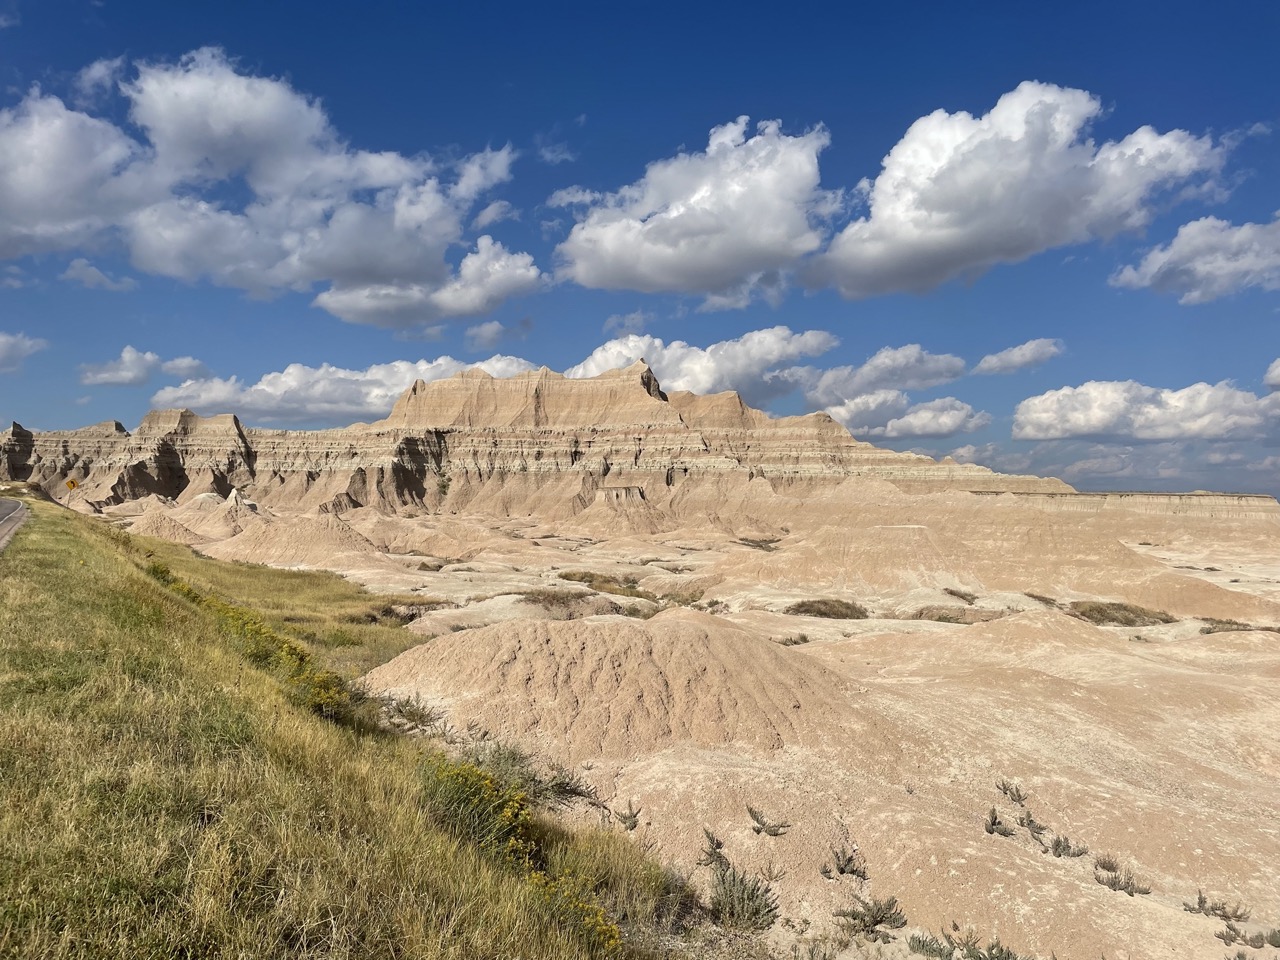
Aliasing is visual imperfections in a rendering resulting from the fact that we are rendering not at an infinite resolution but at some finite resolution. Most noticeably, aliasing manifests as jaggy edges, but the effect understand is pervasive to the whole scene even within polygons we have aliasing which tends to be more noticeable on detailed textures when the camera or polygons are moving.
To mitigate aliasing, the most obvious and simplest thing to do is to render at a higher resolution, the higher we go, the less noticeable these imperfections. The obvious problem then is that while monitors only have so much resolution and secondly the higher the resolution we render to, the bigger the performance hit, so what we call anti-aliasing encompasses any technique meant to mitigate aliasing by some means other than just simply rating the resolution.
Anti-Aliasing
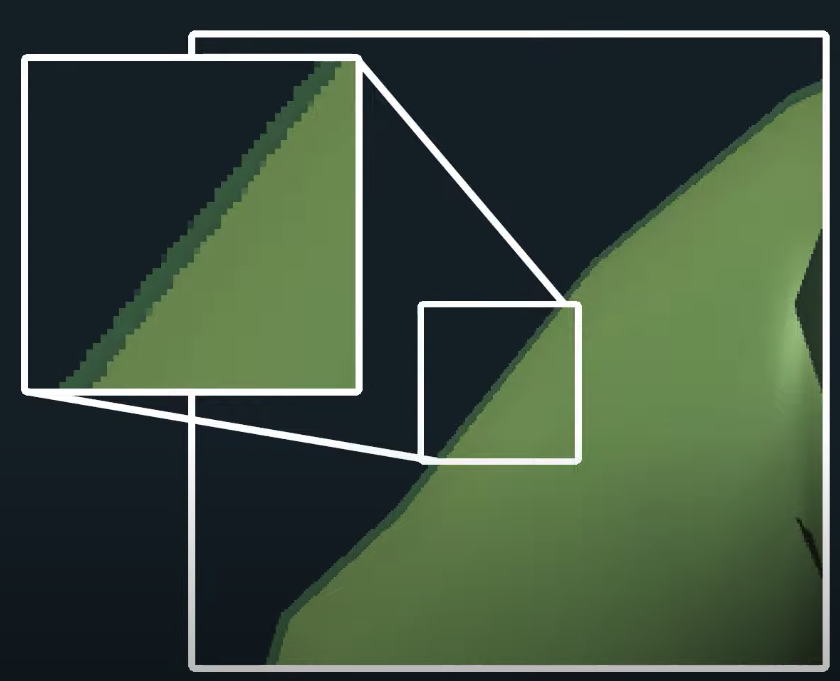
The simplest and most obvious anti-aliasing technique is what’s called super sampling. The ideal is simply that we render at a high resolution but then down sample for out final output, so say if I’m running at 1080p but using 4x super sampling, then internally the rendering is being done at a 4k resolution, but then that gets down sampled to 1080, this is not only the simplest technique, it’s also the most effective but the obvious downside is for paying all the costs of rendering at the higher resolution, so it’s only really useful when we care only about image quality and not performance. So super sampling as a technique was really short lived in games and then we moved on to what’s called MSAA, multi sample anti-aliasing, which as we’ll discuss in detail in a moment. It’s a quite similar idea we’re sort of rendering at a higher resolution except as we’ll see it cuts down on the amount of fragment processing work and so it’s considerably more efficient.
MASS however still incurs of significant performance hit, and so in more recent years, it’s been superseded by a number of techniques that all apply a kind of edge detection and blurring in a post processing effect, this includes FXAA, fast approximate, MLAA, morphological and its variant SMAA, subpixel morphological and we have TSAA, a temporal sample, which as the name implies, it takes into account two changes from frame to frame, there are many variants of these techniques and they have their trade-offs but generally these are the most efficient anti-aliasing, and so they’re the ones most commonly used today. Arguably then multisample AA is a bit out of date, but it does have special support in the hardware, and it is simpler than the more recent techniques, and so it’s the one that we’re going to cover here.
Multisample Anti-Aliasing (MSAA)
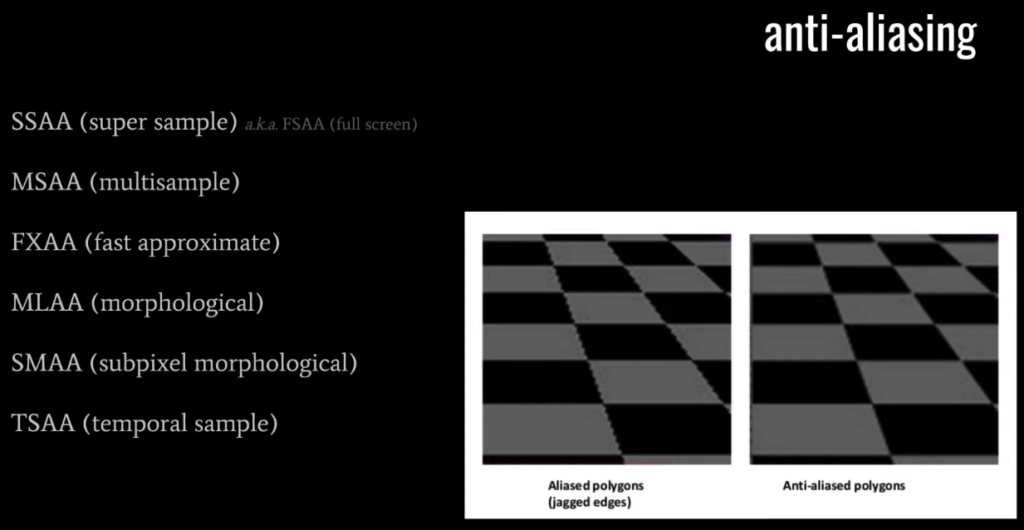
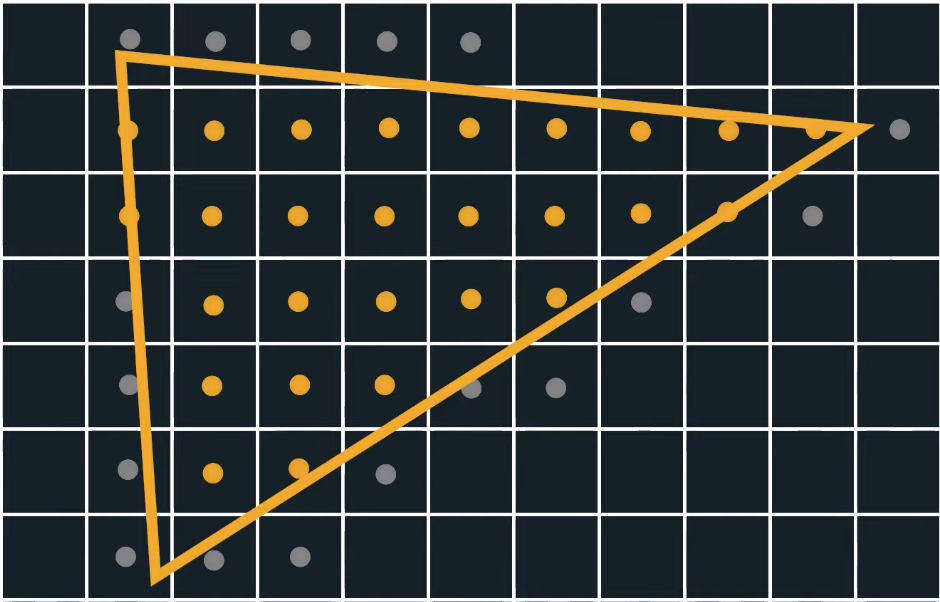
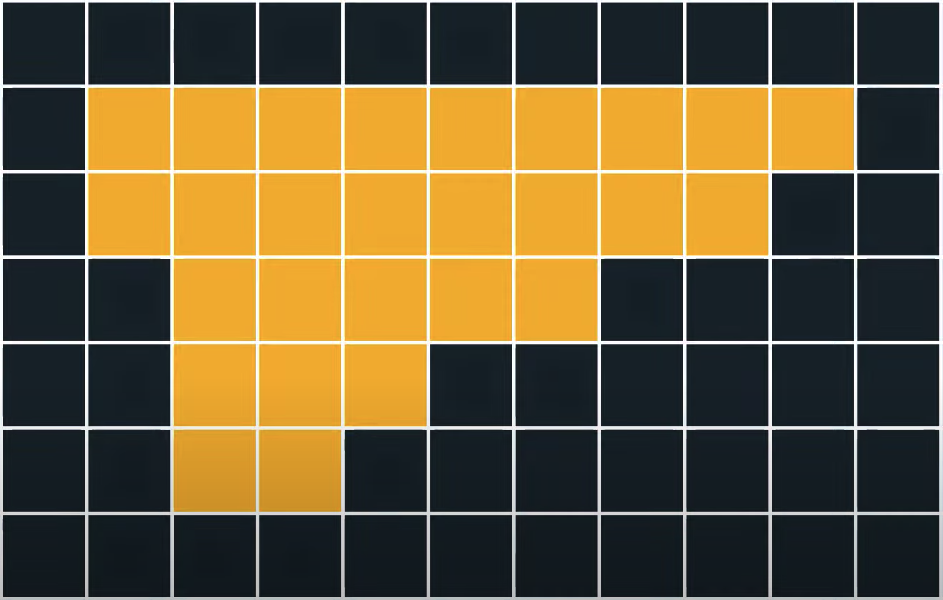
So in regular rendering without multi sampling we have effectively one sample point per pixel, the center of the pixel itself. With multisample as the name implies, we have multiple samples per pixel which could be two if we’re using 2x multi sample or four for using 4x multi sample or etc. 4x is probably the most commonly used, because 2x doesn’t get you that much of a visual benefit and anything greater than 4x tends to be too expensive so let’s say that we have 4 sample points within each pixel we then for out buffers need to store 4 values per pixel just as if we were rendering at four times the resolution, so in terms of these buffer sizes, we’re paying the same cost as if we were rendering at the higher resolution. The difference is that when we rasterize our triangles, the in-bounds check is performed against these sample points not the center of the pixel and so for interior pixels of a triangle, all four sample points will be in bounds but then for pixels on the edge, only one or two or three will be in bounds, and if you notice in the diagram here that the gird of four pixels is slightly rotated that’s usually how the sampling points are arranged, because it effectively cuts across the grid of our pixels and so it’s going to give us slightly more effective anti-aliasing, anyway for any pixel where at least one of these sample points is in bounds of the triangle. Well the depth and stencil values are computed per inbound sample point just as if we were rendering at a higher resolution, but even if more than one sample point is in bounds, we only run the fragment shader once, and we do so with the vertex attributes interpolated to the center of the pixel, just as if we were rendering the pixel normally. So for this triangle and this pixel that’s in bound we only get one output color but remember for each pixel we have four color values, each corresponding to one of the sample points and we write the output of the fragment shader to only those slots corresponding to the sample points that are in bounds. So here in the diagram we have the two left sample points those are in bounds so the color value is only going to be written for those sample points but not the two others. So this is how the rendering proceeds and then when all the rendering is done and we’re ready to display, the four color values per each pixel get averaged together into one color value and that is what we actually see. So be clear then, that four pixels that are on the interior of a triangle well all four sample points are going to be inside and so they’re going to get the same color value, the same color value repeated four times when averaged together just gets you that same color value, so multisampling effectively just gets us the same result for those pixels, it doesn’t do anti-aliasing for the interiors of our triangles. For the edge pixels however, such as in the diagram the four samples per pixel are likely going to have different color values and so when you average them you get a different result which is effectively like a blur on that edge thus mitigating the aliasing problem. So unlike super sampling, even though we’re rendering to equivalent sized buffers, we’re not paying all the same cost in terms of the fragment processing, the fragment shader will typically run significantly less than if instead we were using super sampling. Note however that relative to running without multi-sampling, the fragment shader will run some number of times more because of edge pixels where the center is not in bounds but one or more of the multi sample points are in bounds and so for many edge pixels where otherwise the fragment shader would run just once sometimes it will run twice or even three or four times if you happen to have four different triangles that all intersect around the center of the pixel, for sample points could be in balance of four different triangles, so on top of the extra depth and stencil testing that we’re doing for all the sample points on top of that the fragment shader is being run more particularly in scenes where you have many small triangles and so you have many more edge pixels in fact in the worst case scenario, your whole scene could be a bunch of tiny little triangles such that each sample point is in bounds of a different triangle and so we would end up paying all the cost of super sampling. So the denser more elaborate our geometry the closer we are to that worst case scenario. More typical cases however for x-multi sample intends to get us about like a 30% performance hit on most modern hardware somewhere in that ballpark.
 |  |
 |  |
MSAA in OpenGL
If we want to use MSAA in OpenGL we need to use a buffer that is able to store more than one sample value per pixel. We need a new type of buffer that can store a give amount of multisamples and this is called a multisample buffer.
Most windowing systems are able to provide us a multisample buffer instead of a default buffer. GLFW also gives us functionality and all we need to do is hint GLFW that we’d like to use a multisample buffer with N samples instead of normal buffer by calling glfwWindowHint before creating the window:
glfwWindowHint(GLFW_SAMPLES, 4);When we now call glfwCreateWindow we create a rendering window, but this time with a buffer containing 4 subsamples per screen coordinate. This does mean that the size of the buffer is increased by 4.
Now that we asked GLFW for multisampled buffers we need to enable multisampling by calling glEnable with GL_MULTISAMPLE. On most OpenGL drivers, multisampling is enabled by default so this call is then a bit redundant, but it’s usually a good idea to enable it anyways. This way all OpenGL implementations have multisampling enabled.
glEnable(GL_MULTISAMPLE);Because the actual multisampling algorithms are implemented in the rasterizer in your OpenGL drivers there’s not much else we need to do.
Off-screen MSAA
Because GLFW takes care of creating the multisampled buffers, enabling MSAA is quite easy. If we want to use our own framebuffers however, we have to generate the multisampled buffers ourselves; now we need to take care of creating multisampled buffers.
There are two ways we can create multisampled buffers to act as attachments for framebuffers: texture attachments and renderbuffer attachments.
Multisampled texture attachments
glBindTexture(GL_TEXTURE_2D_MULTISAMPLE, tex);
glTexImage2DMultisample(GL_TEXTURE_2D_MULTISAMPLE, samples, GL_RGB, width, height, GL_TRUE);
glBindTexture(GL_TEXTURE_2D_MULTISAMPLE, 0);
glFramebufferTexture2D(GL_FRAMEBUFFER, GL_COLOR_ATTACHMENT0, GL_TEXTURE_2D_MULTISAMPLE, tex, 0);
Multisampled renderbuffer objects
glRenderbufferStorageMultisample(GL_RENDERBUFFER, 4, GL_DEPTH24_STENCIL8, width, height);Render to multisampled framebuffer
Rendering to a multisampled framebuffer is straightforward. Whenever we draw anything while the framebuffer object is bound, the rasterizer will take care of all the multisample operations. However, because a multisampled buffer is a bit special, we can’t directly use the buffer for other operations like sampling it in a shader.
A multisampled image contains much more information than a normal image so what we need to do is downscale or resolve the image. Resolving a multisampled framebuffer is generally done through glBlitFramebuffer that copies a region from one framebuffer to the other while also resolving any multisampled buffers.
glBlitFramebuffer transfers a given source region defined by 4 screen-space coordinates to a given target region also defined by 4 screen-space coordinates. If we bind to GL_FRAMEBUFFER we’re binding to both the read and draw framebuffer targets. We could also bind to those targets individually by binding framebuffers to GL_READ_FRAMEBUFFER and GL_DRAW_FRAMEBUFFER respectively. The glBlitFramebuffer function reads from those two targets to determine which is the source and which is the target framebuffer. We could then transfer the multisampled framebuffer output to the actual screen by blitting the image to the default framebuffer:
glBindFramebuffer(GL_READ_FRAMEBUFFER, multisampledFBO);
glBindFramebuffer(GL_DRAW_FRAMEBUFFER, 0);
glBlitFramebuffer(0, 0, width, height, 0, 0, width, height, GL_COLOR_BUFFER_BIT, GL_NEAREST);
But what if we wanted to use the texture result of a multsampled framebuffer to do stuff like post-processing? We can’t directly use the multisampled texture(s) in the fragment shader. What we can do however is blit the multisampled buffer(s) to a different FBO with a non-multisampled texture attachment. We then use this ordinary color attachment texture for post-processing, effectively post-processing an image rendered via multisampling. This does mean we have to generate a new FBO that acts solely as an intermediate framebuffer object to resolve the multisampled buffer into; a normal 2D texture we can use in the fragment shader. This process looks a bit like this in pseudocode:
unsigned int msFBO = CreateFBOWithMultiSampledAttachments();
// then create another FBO with a normal texture. color attachment
[...]
glFramebufferTexture2D(GL_FRAMEBUFFER, GL_COLOR_ATTACHMENT0, GL_TEXTURE_2D, screenTexture, 0);
[...]
while(!glfwWindowShouldClose(window))
{
    [....]
    glBindFramebuffer(msFBO);
    ClearFramebuffer();
    DrawScene();
    // now resolve multisampled buffer(s) into intermediate FBO
    glBindFramebuffer(GL_READ_FRAMEBUFFER, msFBO);
    glBindFramebuffer(GL_DRAW_FRAMEBUFFER, intermediateFBO);
    glBlitFramebuffer(0, 0, width, height, 0, 0, width, height, GL_COLOR_BUFFER_BIT, GL_NEAREST);
    // now scene is stored as 2D texture image, so use that image for post-processing
    glBindFramebuffer(GL_FRAMEBUFFER, 0);
    ClearFramebuffer();
    glBindTexture(GL_TEXTURE_2D, screenTexture);
    DrawPostProcessingQuad();
}